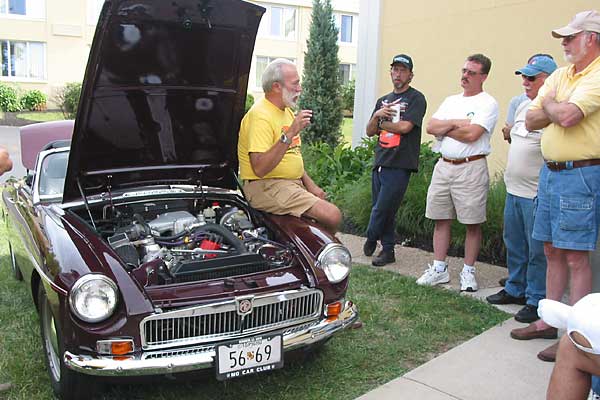
Jim Stuart explains installation of Rover Electronic Fuel Injection
British V8 2007 Tech Session: Installing Rover Electronic Fuel Injection
as published in British V8 Newsletter, Volume XV Issue 2, September 2007presented by: Jim Stuart
coverage by: Curtis Jacobson
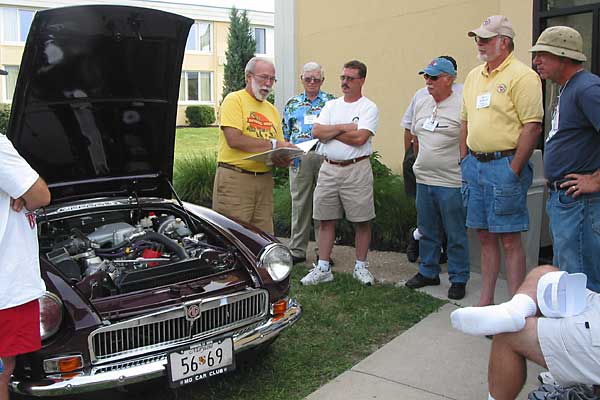
Jim's Stuart's fuel injection tech session started at 4pm on Saturday afternoon. We met next to Jim's handsome burgundy roadster, in the grass behind the hotel. A very good group, as usual, made for a very interesting conversation. Jim skillfully guided the conversation by pointing out the various system components and then commenting on his experiences with them.
Jim's roadster (which was featured in our Spring issue) features a Rover 4.0 "take out motor". As Jim explained, the engine was bought with very low mileage after being pulled by a Range Rover dealer to service a warranty claim. Originally Jim had installed a Buick 215 (3.5L) engine in this car, and he had already converted the Buick engine from 4-barrel carburetor to Rover 14CUX fuel injection. (The "4.0" was actually built with a later "GEMS" system, not the 14CUX seen here.) So this car has been methodically upgraded over a number of years. Jim has also completed five other MGB engine swaps.
Jim's first observation: "You have to lower the plenum!" People have been known to
mount their engines at different heights and at different distances from the
firewall... but without a doubt most people will find that they have to lower the
plenum, and Jim showed where a milling machine can be used to take material off
the lower surface of the plenum base. If necessary, a little additional material
can be machined at the mating surface between the plenum base and plenum chamber.
What about the other side of the intake manifold? Jim's advice is not to worry about injector clearance at the head ports. You can notch the valley pan a little to keep it from infringing on the spray pattern of the injectors, but from Jim's experience it simply isn't necessary to modify the aluminum head. (Other sources have reported that you need to take a file or die grinder to the cylinder head to provide added clearance.)
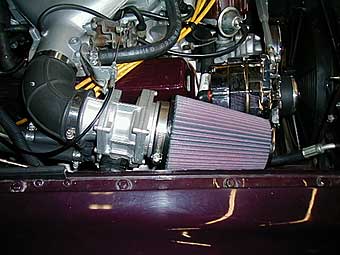
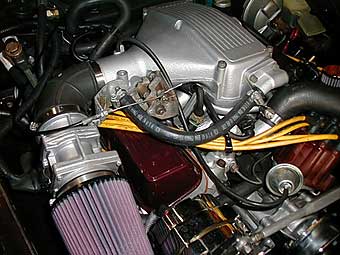
Jim showed that the plenum is reversible - you can point the throttle body toward
the driver side of the engine compartment (as Rover did) or simply flip it around
to the passenger side (as Jim did.) If you reverse it, obviously that changes the wiring
and throttle cable routing.
That's pretty much it for "mechanical parts".
What parts of the system should we keep in mind from a maintenance point of view? The idle bypass valve is most likely to give problems. The failure mode is that the valve gets gunked-up, which typically either causes a too-fast idle or else a "searching" engine speed when idling with no load, such as on downhills. (This part won't leave you stranded.) Jim also commented that the idle bypass valve is a GM part. You'll probably need one at some point, so it's good to know you can get one anywhere and save money too.
Oxygen sensors are the second most likely offender. Rover's O2 sensors aren't the cheapest or most readily available (they're a different technology from most other cars) - but they are interchangeable with the sensors on some Nissan cars, so there's savings to be found there.
From Jim's experience, the fuel temperature sensor on the fuel manifold (which wraps around the plenum and supplies the eight injectors) and the water temperature sensor (which threads into the intake manifold) usually DON'T give problems.
What about injectors? Jim ran three years with injectors that came from a junkyard - no problem! The original injectors were made by Bosch, but there are Ford injectors available cheaper as a replacement alternative. More importantly, it's easy to have injectors cleaned locally.
First Valuable Tip! A diesel engine shop (that services heavy duty trucks) will clean injectors for just $3 to $5 each. Typically they'll do it while you wait. On the other hand, your local car dealership will want $20 each to clean injectors!
What about the other side of the intake manifold? Jim's advice is not to worry about injector clearance at the head ports. You can notch the valley pan a little to keep it from infringing on the spray pattern of the injectors, but from Jim's experience it simply isn't necessary to modify the aluminum head. (Other sources have reported that you need to take a file or die grinder to the cylinder head to provide added clearance.)


That's pretty much it for "mechanical parts".
What parts of the system should we keep in mind from a maintenance point of view? The idle bypass valve is most likely to give problems. The failure mode is that the valve gets gunked-up, which typically either causes a too-fast idle or else a "searching" engine speed when idling with no load, such as on downhills. (This part won't leave you stranded.) Jim also commented that the idle bypass valve is a GM part. You'll probably need one at some point, so it's good to know you can get one anywhere and save money too.
Oxygen sensors are the second most likely offender. Rover's O2 sensors aren't the cheapest or most readily available (they're a different technology from most other cars) - but they are interchangeable with the sensors on some Nissan cars, so there's savings to be found there.
|
Enjoying this article? Our magazine is funded through the generous support of readers like you! To contribute to our operating budget, please click here and follow the instructions. (Suggested contribution is twenty bucks per year. Feel free to give more!) |
From Jim's experience, the fuel temperature sensor on the fuel manifold (which wraps around the plenum and supplies the eight injectors) and the water temperature sensor (which threads into the intake manifold) usually DON'T give problems.
What about injectors? Jim ran three years with injectors that came from a junkyard - no problem! The original injectors were made by Bosch, but there are Ford injectors available cheaper as a replacement alternative. More importantly, it's easy to have injectors cleaned locally.
First Valuable Tip! A diesel engine shop (that services heavy duty trucks) will clean injectors for just $3 to $5 each. Typically they'll do it while you wait. On the other hand, your local car dealership will want $20 each to clean injectors!
Second Valuable Tip! When you need replacement fuel injector o-rings: expect to pay
$6 (per set) at NAPA, $12 at a dealer, or just $1 at your local diesel shop.
What about electrical hook-up? Electrical hook-up is easy.
Jim almost stopped there, but then continued: It's very important you make sure the coil sensor cable is connected! Otherwise, the ECM won't know that your engine is running. If it's not sure the engine is running, it will automatically turn off the fuel pump! That was one lesson Jim learned the hard way. (Editor's note: if you get into a bind like this one, and you need technical advice about installing Rover EFI, Glen Towery has a great deal of knowledge and is generous with it. He can also hook you up with spare parts! Please see his ad below.)
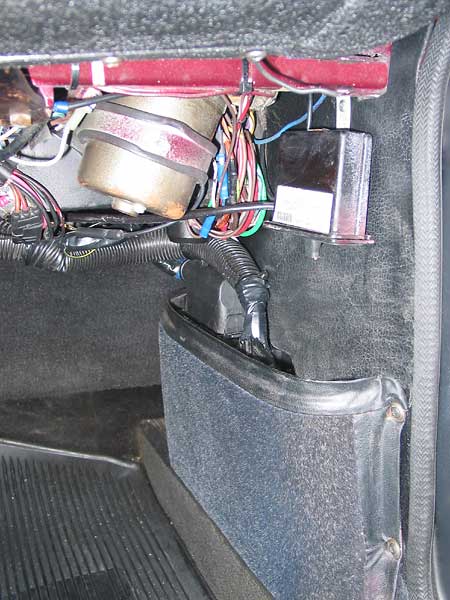
Neat Trick! Jim's ECM (engine control module... the computer "brains" behind the system)
is neatly tucked into the passenger-side footbox storage pocket. No bracket is required,
and it's convenient to service. Jim mounted his (LED) diagnostic display above the storage
pocket, so it's easy to read in the shadows under the dashboard.
What about programming the ECM? The ECM is not user programmable, but that's not a problem because it works great right out of the gate. (The Rover system has a mass airflow sensor, so it's pretty good at adjusting itself for changing conditions.) Jim said he has never even been tempted to have his ECU re-chipped.
Does the system need a road speed sensor? Rover used a road speed sensor and the ECM "expects" to see one, but if you don't bother to connect one the only downside Jim has been able to determine is that there's a 30 to 50 RPM "hunt" at idle. (Editor's note: when I borrowed Jim's car later and took it for a test drive, I couldn't even recognize this symptom. The engine ran absolutely flawlessly as far as I could hear or feel. It's a remarkably smooth engine.)
Warning! BE VERY CAREFUL ABOUT VACUUM LEAKS.
What parts of the installation take the most effort? Certainly the fuel tank and fuel line plumbing. Start by replacing your fuel tank or having your existing tank professionally cleaned. Nice, nice, nice new MGB fuel tanks (the Made-in-Canada ones) can be bought for $200.
Secondly, Jim recommends using a later model MGB fuel lever sensor (in conjunction with an earlier tank, with a regular fuel outlet) because the later model sensor provides a de facto built-in "return" port. (Fuel injection systems pump a high volume of fuel to the injectors, and return the excess back to the fuel tank.)
What about electrical hook-up? Electrical hook-up is easy.
Jim almost stopped there, but then continued: It's very important you make sure the coil sensor cable is connected! Otherwise, the ECM won't know that your engine is running. If it's not sure the engine is running, it will automatically turn off the fuel pump! That was one lesson Jim learned the hard way. (Editor's note: if you get into a bind like this one, and you need technical advice about installing Rover EFI, Glen Towery has a great deal of knowledge and is generous with it. He can also hook you up with spare parts! Please see his ad below.)

What about programming the ECM? The ECM is not user programmable, but that's not a problem because it works great right out of the gate. (The Rover system has a mass airflow sensor, so it's pretty good at adjusting itself for changing conditions.) Jim said he has never even been tempted to have his ECU re-chipped.
Does the system need a road speed sensor? Rover used a road speed sensor and the ECM "expects" to see one, but if you don't bother to connect one the only downside Jim has been able to determine is that there's a 30 to 50 RPM "hunt" at idle. (Editor's note: when I borrowed Jim's car later and took it for a test drive, I couldn't even recognize this symptom. The engine ran absolutely flawlessly as far as I could hear or feel. It's a remarkably smooth engine.)
Warning! BE VERY CAREFUL ABOUT VACUUM LEAKS.
What parts of the installation take the most effort? Certainly the fuel tank and fuel line plumbing. Start by replacing your fuel tank or having your existing tank professionally cleaned. Nice, nice, nice new MGB fuel tanks (the Made-in-Canada ones) can be bought for $200.
Secondly, Jim recommends using a later model MGB fuel lever sensor (in conjunction with an earlier tank, with a regular fuel outlet) because the later model sensor provides a de facto built-in "return" port. (Fuel injection systems pump a high volume of fuel to the injectors, and return the excess back to the fuel tank.)
Don't you need a baffled fuel tank? Not until you're within a gallon of empty!
What about the fuel pump? You have to use a high volume pump... and unfortunately pretty much all late model cars have in-tank pumps (to keep the pumps cool.) Jim's solution is to use an (older) Volvo 240 TURBO pump, which will work in both a sucker and pusher configuration. In other words, it will suck fuel up to 8" in height and then push it forward to the engine. (Airtex makes a service-part version of this pump for $100.) Remember to put a fuel filter both before and after the pump!
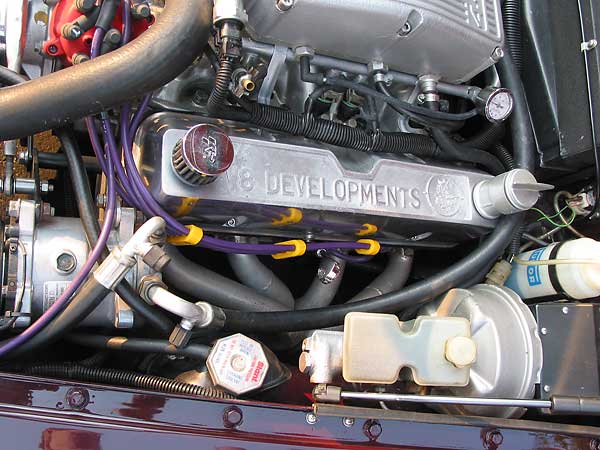
What about fuel pressure? Jim put a fuel pressure gauge on the fuel rail and fitted an
adjustable fuel pressure regulator. He ran 3 years before doing it. And what was the
result? Messing with it didn't give him any perceptible improvement. He now keeps the
fuel pressure regulator set at about 46psi (running). (34-38psi was Rover's spec.)
Jim also noted that some Rover fuel rails come with a Shraeder valve for (relatively) convenient checking of the fuel pressure.
Participant Dale Knapke (who has installed a fuel-injected Ford SVO engine in his TR6) recommending NOT installing an adjustable fuel pressure regulator because improving performance at one engine load tends to screw up performance at a different engine load.
At about this time, we started to become aware that we were running out of time. (Kurt and Sue rushed by on their way to the meet's banquet... and to their wedding!) Jim started to wrap up the tech session.
What are the reasons to bother with this installation?
Jim laid out his answer in four parts:
1) You can reasonably expect better fuel mileage by about 5 MPG.
2) You can expect easy cold weather starts.
3) With fuel injection, the Rover engine is more responsive. It simply drives better.
4) The fuel injection system is simple to service.
Jim concluded that he couldn't think of any downside.
In fact, he went on to say: "I would never, ever go back to a carburetor and I'm trying to figure out how to put this system on my (Buick 300 powered) MGB-GT."
Editors Note: after the banquet, I had the opportunity to take Jim's car for a test
drive on twisty country roads. With the fuel-injection there was never a single moment
when the engine didn't sound and feel perfectly composed. It pulled strongly without
hesitation and it never complained. What a wonderfully smooth and "driveable" car!
Disclaimer: This page was researched and written by Curtis Jacobson. Views expressed are those of the author, and are provided without warrantee or guarantee. Apply at your own risk.
Photos by Curtis Jacobson. All rights reserved.
What about the fuel pump? You have to use a high volume pump... and unfortunately pretty much all late model cars have in-tank pumps (to keep the pumps cool.) Jim's solution is to use an (older) Volvo 240 TURBO pump, which will work in both a sucker and pusher configuration. In other words, it will suck fuel up to 8" in height and then push it forward to the engine. (Airtex makes a service-part version of this pump for $100.) Remember to put a fuel filter both before and after the pump!

Jim also noted that some Rover fuel rails come with a Shraeder valve for (relatively) convenient checking of the fuel pressure.
Participant Dale Knapke (who has installed a fuel-injected Ford SVO engine in his TR6) recommending NOT installing an adjustable fuel pressure regulator because improving performance at one engine load tends to screw up performance at a different engine load.
At about this time, we started to become aware that we were running out of time. (Kurt and Sue rushed by on their way to the meet's banquet... and to their wedding!) Jim started to wrap up the tech session.
What are the reasons to bother with this installation?
Jim laid out his answer in four parts:
1) You can reasonably expect better fuel mileage by about 5 MPG.
2) You can expect easy cold weather starts.
3) With fuel injection, the Rover engine is more responsive. It simply drives better.
4) The fuel injection system is simple to service.
Jim concluded that he couldn't think of any downside.
In fact, he went on to say: "I would never, ever go back to a carburetor and I'm trying to figure out how to put this system on my (Buick 300 powered) MGB-GT."

Disclaimer: This page was researched and written by Curtis Jacobson. Views expressed are those of the author, and are provided without warrantee or guarantee. Apply at your own risk.
Photos by Curtis Jacobson. All rights reserved.
ADDITIONAL INFORMATION
| If you like this article, you'll probably also like: | ||
| 1 | Hot To Service Rover 14CUX Electronic Fuel Injection by Curtis Jacobson, | |
| 2 | How Glen Towery Installs Rover EFI on MGB V8 Conversions by Greg Myer, and | |
| 3 | Fuel Injection: Not Such a Black Art by Roger Parker. | |
| You may also like to review how Rover EFI systems have been installed on these sports cars: | ||
| 1 | Evan Amaya's Rover powered 1964 MGB | |
| 2 | Neil Brown's Triumph powered 1968 Triumph TR-250 | |
| 3 | Bob Edgeworth's Rover powered 1972 MGB | |
| 4 | Mark Mallaby's Rover powered MG RV8 | |
| 5 | Scott Miller's Rover powered MG RV8 | |
| 6 | Nick Nicholas's Rover powered MGB | |
| 7 | Jim Stuart's Rover powered 1966 MGB | |
| 8 | Glen Towery's Rover powered 1974 MGB/GT | |
| 9 | Barry Yardley's Rover powered 1977 MGB | |
| 10 | Edd Weninger's Rover powered 1977 MGB | |


