Is There a Ford In Your Future?
(originally published in British V8 Newsletter, Volume XI Issue 2, May 2003)by: Dan Masters
In the early 60s, a chicken farmer from Texas imported a small, lightweight sports car from England, stuffed an American V8 into it, and went out and kicked butt on racing circuits all over the world. In 1965, this unlikely combination won the World's GT Championship, beating no less than the prancing red horses of Signor Ferrari. The chicken farmer was Carroll Shelby, the Car was an AC Ace, and the engine was an all-iron Ford small block. (Ed. Note: that same "chicken farmer" had already beaten Ferrari six years earlier behind the wheel of an Aston Martin in the 24 hour race at LeMans.)
At the time, the BOP all-aluminum engine was available, but Shelby chose the Ford, even though it weighed about 130 pounds more. Why did Shelby choose the Ford instead of the lighter BOP engine? Only Shelby knows for sure, but my best guess is, other than political/financial reasons, it had a lot to do with the 260CI Ford displacement vs the 215CI BOP displacement. It is rumored that Colin Chapman once said that "light weight is next to Godliness." Perhaps, and I sure can't argue with that, but Shelby proved that power is Godliness! As any old hot-rodder will tell you: "there is no replacement for displacement." I certainly won't dare to suggest that the extra 45 cubic inches was the sole reason, or even a primary reason, that Shelby chose the Ford, but I will tell you that the extra 87 cubic inches available in the modern 302CI incarnation of Shelby's choice is a prime factor in my selecting this engine for my own version of a "Cobra."
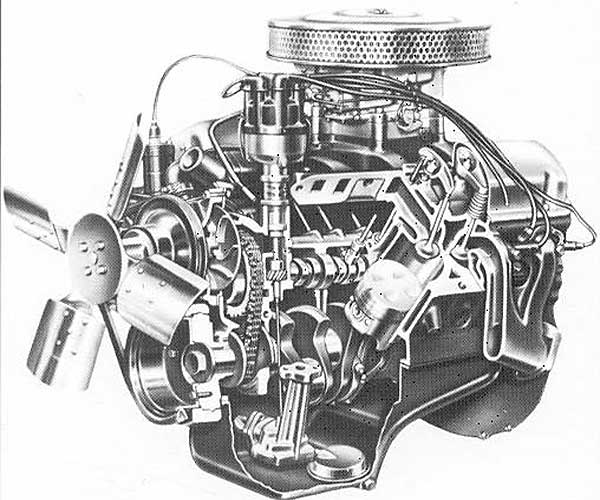
Ford engine cut-away, showing oil pump detail. Even if the oil pick-up is moved to
the rear of the pan, the pump itself still requires a fairly deep pan in front.
That's not to suggest that the BOP (or the Rover as available now) isn't a good choice for any of our small British sports cars. If you own a late model rubber bumper MGB, from about 1977 on, the ease of installation of the BOP/Rover makes it a very attractive choice. As with anything, there are pros and cons associated with any engine choice you might make, and the options are almost unlimited. Chevy 350, Buick 231 V6, GM 60 degree V6, - these are just a few of the more common options available, not to mention some of the more exotic engines, such as the Mercedes-Benz all aluminum V8s or V6s, the Toyota "minihemi" V8, or any of the modern crop of high tech, light weight engines that are just now making their way in to the boneyards in significant numbers. In the next issue of the Newsletter, I plan to discuss some of the available and suitable V6 engine choices, but for this article, I will stick to my personal favorite, the Ford 302!
The Ford 302 is slightly smaller externally than the BOP/Rover - not enough to provide a significant advantage, but enough so that if there's room for the BOP/Rover, there will be enough room for the Ford. A complete 302, with aluminum heads, intake, water pump, a light weight starter and a 27 pound flywheel will weigh about 435 pounds. A T5 transmission and bellhousing will weigh about 85 pounds, for a total weight of about 520 pounds. This is only 25 pounds more than an MGB engine with an OD transmission, and about 55 pounds than a TR6 with an OD transmission. Twenty five extra pounds on the front of an MGB are not going to significantly alter the handling characteristics of the car. Losing 55 pounds on a TR6 will improve the handling, but not significantly. On the other hand, a BOP/Rover with a T5 will only weigh about 440 pounds.
At this point, we might pause a moment to review some simple rules:
1. All else being equal, lighter is better.
2. All else being equal, 50/50 weight distribution is better.
3. All else being equal, more power is better.
4. All else being equal, low cost is better.
5. All else being equal, ease of installation is better.
6. All else is seldom equal.
Consider rule #1. An MGB with a BOP/Rover V8 weighs approximately 2500 pounds. With a 200HP engine, that's 12.5 pounds per horsepower. Switching to a Ford 302 will add 80 pounds. To maintain the same weight to power ratio, the Ford will need to have 206HP. In a straight line, a 206HP Ford powered MGB will perform exactly the same as the 200HP BOP/Rover powered MGB. What about corners? With only 206HP, the Ford engined car will be at a slight disadvantage, but the difference will only be apparent at or near the limits of the car's adhesion. Eighty pounds on a 2500 pound car is only 3 percent. On the other hand (considering rule #6), a 2500 pound, 200HP MGB will be left in the dust by a 2580 pound, 300HP MGB. In other words, with an extra 100HP to play with, all else is equal!
Consider rule #2. A 2500 pound MGB with a BOP/Rover has a 50/50 weight distribution, adding the extra 80 pounds of the Ford will change the weight to 2580, and the distribution ratio to 51.5/48.5 (actually, it won't be that bad, because not all of the weight will be over the front wheels). I challenge you to find a high performance, production front engine rear wheel drive sports car with a weight distribution much closer to 50/50 than that! The Cobra certainly didn't have it. Ferraris didn't. Corvettes don't. There may have been a few makes that did, but only a few. While desirable, 50/50 isn't the holy grail of performance. Again, a 200HP 50/50 MGB will be left in the dust by a 300HP 51.5/48.5 MGB. All else being equal, that is.
Consider rules #3 & #4. How much power do you need? Excuse me, I should say how much power do you want? I have driven MGs and Triumphs with 350 to 375HP, and I like that a lot better than 200 - 250. While even as little as 150 is an improvement over stock, more power is preferred as long as the engine is still manageable and drivable, at least in my humble opinion. How much does 300HP cost? On a BOP/Rover? On a 302 Ford? We'll discuss costs later.
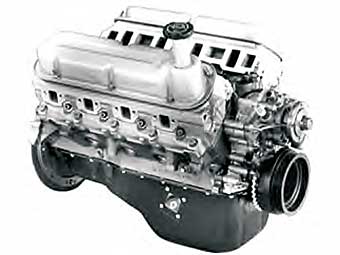
Go to your Ford dealer, ask for part number M-6007-XB3, write a check for $3,195 plus tax, and this is what you'll get. Rated by Ford at 345HP, this engine has been dynoed at 375HP by two car magazines. Shop around, and you can get it for less.
Consider rule #5. For some of us, ease of installation is of prime importance. Not all of us have the time, tools, or talent to tackle a difficult engine swap. Some of us, however, do have the time, tools, and talent to tackle even the most complicated engine swap. Yet others have the necessary money to pay those that have the time, tools, and talent to do the job for them. On average, though, ease of installation is a significant factor in selecting an engine for a swap. We'll discuss this later also.
Consider rule #6. All else is very seldom, if ever, equal. Add a few pounds to the front end, and you may find that the heavier axle required to handle the higher power may just put the car back closer to the ideal 50/50 weight distribution. Or, the heavier engine just might have enough extra power to more than offset any added weight. If you want more power, the cost isn't going to stay the same. Bottom line is - you have to consider all factors before making a decision. Now back to Ford information!
The Ford 302 began life in 1961 as a 221CI engine for use in the staid family sedan, the Fairlane. It was almost immediately bumped up to 260CI, and this was the original engine used by Shelby for the Cobra. The 289 followed soon, and in 1968, the 302 was introduced. This engine family was one of, if not the, first to use the new "thin-wall" casting techniques. This casting technique greatly reduced the possibility of core shift during the pouring of the molten metal to make the engine. This, in turn, greatly reduced the requirements for extra thick walls in the engine which had been required to allow for machining without breakthrough due to core shift. Reducing the wall thickness greatly reduced the weight. Improvements in metallurgy also allowed the engineers to design the block such that it ended at the center line of the crank, rather than extending below it as was the case in most other engines. This also contributed to the reduction in weight.
Many other changes and improvements have been made over the years, but the engine has stayed basically the same through all the changes. Parts from one engine will usually fit about any other engine, perhaps with a little machining. Some of the changes haven't been significant enough to merit discussion, while others have been. The more significant changes are:
1984: Throttle body fuel injection was available.
1986: The cam was changed to a hydraulic roller cam.
1988: Individual port injection EFI with Speed-density air intake sensing was introduced.
1989: Speed-density air flow sensing was replaced with Mass-air sensing.
(Not all of the above changes applied to all Ford models.)
In 1965, Ford changed the bell housing pattern from a 5-bolt to the current 6-bolt. Unless you also want to use an early transmission, stay away from pre-65 engines.
In 1980, Ford changed the external balance weights on the flywheel from 28.2 oz-in to 50.0 oz-in. If you are putting together an engine from parts, make sure you use the proper crank damper and flywheel for your particular engine. If not, SEVERE vibration will result.
The engine mounting bolt holes on the passenger side are set back by 7/8" from the holes on the driver's side (it is believed that all 289 - 302 engines have the same offset, but you should measure to be sure). You have three choices when it comes to making motor mounts: you can make the mounts the same and offset the chassis mounting position, you can make each mount different and not offset the chassis mounting points, or you can design the mounts so that they are the same for each side and still use the same chassis mounting points. See F for details on the third option.
|
Enjoying this article? Our magazine is funded through the generous support of readers like you! To contribute to our operating budget, please click here and follow the instructions. (Suggested contribution is twenty bucks per year. Feel free to give more!) |
Ford numbers the cylinders using a different pattern than GM. As a result, the firing order is different. However, if you should, out of habit, number the cylinders as per GM, you can use the GM firing order instead of the Ford, and all will be well.
In other words, the pistons fire in the same order for both brands - only the numbering is different. On the other hand, the later Ford 302 HO engines use the same firing order as the 351: 1-3-7-2-6-5-4. Check your engine to be sure!
If you are using a late model engine, with a roller cam, it is imparative that you use the proper drive gear on the distributor. You must either use a bronze or a special steel distributor drive gear, or the drive gear and the cam gear will be chewed up in a very sort time.
Serpentine vs. V-belt: The water pump for a serpentine belt drive system rotates in the opposite direction as does the water pump for a V-belt installation. Stock and aftermarket pumps are available for both types, but be sure to use the correct type for the belt drive system you are using. If you just swap out the pulley, the water pump will be extremely inefficient, and overheating may result.
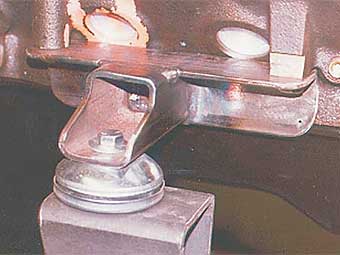
Custom motor mount. The tube steel piece is welded at a 2 1/2 degree angle to the angle steel,
so the motor sits at proper angle for drivetrain phasing and carb flange is nominally level.
What about motor mounts? They're not hard to fabricate. If you offset the chassis mount position from the
centerline between the engine mount holes by one-half the distance "X," where X is the offset from one side
of the engine to the other, identical mounts can be made for both sides of the engine, yet the chassis mounts
will be symmetrical on both sides of the chassis.
Costs are extremely variable, depending on the end results desired and how good you are bargaining. If you are active in the automobile hobbyist community where you live, you might be able to pick up a good used engine for under $200.
If you walk in off the street cold, a perfect stranger to the boneyard folks, and have "sucker" written on your forehead, you still should be able to buy a good late model engine, complete, for under $1500.
Once you've purchased the base engine, the cost of the ancillaries needed to complete it are about the same cost as for any engine. Carburetors, alternators, etc, will cost exactly the same. Intake manifolds, starters, etc, will vary a little from make to make, but will still be in the same ball park from engine to engine. If you are looking for used parts, you will find a wide range of availability and cost from depending on the engine you are using. Chevy parts, being that Chevies are the most common engine used in an engine swap, will be the easiest and cheapest to find. The relative rarity of BOP/Rover engine makes finding used parts for them a bit more difficult and costly. With the rapidly growing popularity of the Mustang comes a rapidly expanding availability of aftermarket and used parts, along with a lowering price range as the popularity grows.
What about new parts? Ford Motor Company sells 6 different 302/5.0 crate engines - 4 with aluminum heads and 2 with iron heads - ranging in (Ford) rated HP from 225 to 345.
All 4 aluminum head engines retail for $3,195, while the 2 iron head engines retail for $2,895 or $2,995. Let's assume you're willing to spring for the extra $300 and want to buy the highest powered version. Your cost breakdown for a complete engine, using brand new parts as shown, would look something like:
Unless you have money to spare, there is no reason to pay the above prices - all of the above parts are available at discount prices if you shop around. In addition to the parts listed above, you'll need to add exhaust headers, pulleys, and alternator mounting brackets. Currently, there are no commercially available exhaust headers, so you will either have to make your own or have them made. There is at least one conversion shop that I know of that is in the planning stage for producing custom headers for MGB applications, so that will simplify things considerably.
In addition to headers, you will also need to buy or make mounting brackets and pulleys. For the engine I'm using in my TR6, I made my own crank pulley, using a friend's lathe, and used a water pump pulley from a 1977 Buick V6 which I just happened to have around. I also made my own alternator mounting bracket, using scrap pieces of steel, a hacksaw, bench grinder, file, and sandpaper. All totaled, I have about $10.00 invested in materials, plus about $30 in the chrome plating of the parts. If you want to go high end, March makes a very nice set of "billet" pulleys that you could use. Prices for these will run from about $80 to $200, depending on your set-up and tastes.
Power costs money, how much power do you want?
From the boneyard, stock engines are available from 150HP and up. The engine listed above should produce in excess of 350HP. Stroker kits are available to bring the engine displacement up to 347CI, which should enable horsepower output of over 400!
These kits typically run around $1,500 or so. Naturally, if you want to go wild, more power can be had, but at the expense of drive-ability. One of the Ford type magazines recently had an article on a Ford small block engine build that produced 1000HP!
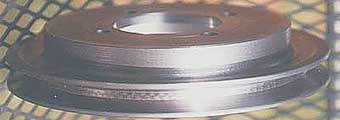
As you might expect, there are some problems involved in fitting one of these engines into an MGB or other small British Sports car. The first problem you may encounter is length. At 27.5", the Ford is a bit longer than either the BOP/Rover or the Chevy small block. I think this is more of a problem in a TR6 than it is in an MGB. In the TR6, the crank pulley butts up against the steering rack, so the front accessories have to be shortened, or the engine has to be set way back in the chassis. This is the primary reason I made my own crank pulley. All of the commercially available pulleys were just too thick. Fortunately, the Buick water pump pulley I had laying around was deep enough to match the thin crank pulley I made, or I would have had to custom make that also.
It may be that the water pump itself causes a fit problem in certain cars. Ford Motorsports sells two shorter water pumps: part number M-8501-E351S for v-belts and M-8501-A50 for serpentine belts. These water pumps measure 1.5" and 1.75" shorter than the stock pump, respectively.
Costs are extremely variable, depending on the end results desired and how good you are bargaining. If you are active in the automobile hobbyist community where you live, you might be able to pick up a good used engine for under $200.
If you walk in off the street cold, a perfect stranger to the boneyard folks, and have "sucker" written on your forehead, you still should be able to buy a good late model engine, complete, for under $1500.
Once you've purchased the base engine, the cost of the ancillaries needed to complete it are about the same cost as for any engine. Carburetors, alternators, etc, will cost exactly the same. Intake manifolds, starters, etc, will vary a little from make to make, but will still be in the same ball park from engine to engine. If you are looking for used parts, you will find a wide range of availability and cost from depending on the engine you are using. Chevy parts, being that Chevies are the most common engine used in an engine swap, will be the easiest and cheapest to find. The relative rarity of BOP/Rover engine makes finding used parts for them a bit more difficult and costly. With the rapidly growing popularity of the Mustang comes a rapidly expanding availability of aftermarket and used parts, along with a lowering price range as the popularity grows.
What about new parts? Ford Motor Company sells 6 different 302/5.0 crate engines - 4 with aluminum heads and 2 with iron heads - ranging in (Ford) rated HP from 225 to 345.
All 4 aluminum head engines retail for $3,195, while the 2 iron head engines retail for $2,895 or $2,995. Let's assume you're willing to spring for the extra $300 and want to buy the highest powered version. Your cost breakdown for a complete engine, using brand new parts as shown, would look something like:
| Long block | $3195 | ||
| Intake manifold | Edelbrock Performer | EDL-2121 | $140 |
| Carburetor | Edelbrock 600CFM | EDL-1405 | $210 |
| Air cleaner | Edelbrock | EDL1207 | $25 |
| Alternator | Delco-Remy (re-man) | GM7127 | $35 |
| Starter | Ford (gear-reduction) | M-11000-A50 | $160 |
| Distributor | Accel | ACC-71202E | $200 |
| Clutch | Ford | M-7560-A302 | $229 |
| Slave Cylinder | McLoed HTOB | (approximately) | $250 |
| Total | $4324 | ||
Unless you have money to spare, there is no reason to pay the above prices - all of the above parts are available at discount prices if you shop around. In addition to the parts listed above, you'll need to add exhaust headers, pulleys, and alternator mounting brackets. Currently, there are no commercially available exhaust headers, so you will either have to make your own or have them made. There is at least one conversion shop that I know of that is in the planning stage for producing custom headers for MGB applications, so that will simplify things considerably.
In addition to headers, you will also need to buy or make mounting brackets and pulleys. For the engine I'm using in my TR6, I made my own crank pulley, using a friend's lathe, and used a water pump pulley from a 1977 Buick V6 which I just happened to have around. I also made my own alternator mounting bracket, using scrap pieces of steel, a hacksaw, bench grinder, file, and sandpaper. All totaled, I have about $10.00 invested in materials, plus about $30 in the chrome plating of the parts. If you want to go high end, March makes a very nice set of "billet" pulleys that you could use. Prices for these will run from about $80 to $200, depending on your set-up and tastes.
Power costs money, how much power do you want?
From the boneyard, stock engines are available from 150HP and up. The engine listed above should produce in excess of 350HP. Stroker kits are available to bring the engine displacement up to 347CI, which should enable horsepower output of over 400!
These kits typically run around $1,500 or so. Naturally, if you want to go wild, more power can be had, but at the expense of drive-ability. One of the Ford type magazines recently had an article on a Ford small block engine build that produced 1000HP!

As you might expect, there are some problems involved in fitting one of these engines into an MGB or other small British Sports car. The first problem you may encounter is length. At 27.5", the Ford is a bit longer than either the BOP/Rover or the Chevy small block. I think this is more of a problem in a TR6 than it is in an MGB. In the TR6, the crank pulley butts up against the steering rack, so the front accessories have to be shortened, or the engine has to be set way back in the chassis. This is the primary reason I made my own crank pulley. All of the commercially available pulleys were just too thick. Fortunately, the Buick water pump pulley I had laying around was deep enough to match the thin crank pulley I made, or I would have had to custom make that also.
It may be that the water pump itself causes a fit problem in certain cars. Ford Motorsports sells two shorter water pumps: part number M-8501-E351S for v-belts and M-8501-A50 for serpentine belts. These water pumps measure 1.5" and 1.75" shorter than the stock pump, respectively.
Another area of concern is the depth of the oil pan at the front. In the BOP/Rover, the oil pump is angled
to one side, and there are passages in the block to carry oil from the rear mounted pick-up to the pump.
In the Ford, the pump sticks straight down into the pan, and the pick-up is attached directly to the pump.
For this reason, there is little you can do to reduce the overall engine depth by more than just a few inches.
Direct from Ford, there are three available oil pan designs: front sump, rear sump, and dual sump.
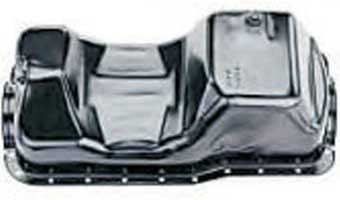
With the front sump design, the oil pickup tube is located very near the oil pump and in the front of the pan. This design has the largest depth at the front of the pan, and will probably cause problems with most installations. The rear sump pan has the shallowest depth at the front of any pan, but it will still cause problems with many installations, as the pump body is still located at the front of the engine, and still requires a significant depth to clear. The third choice is the dual sump, as shown. In this sump, the pickup is located in the rear, same as for the rear sump, but the pan has a "notch" built into it, which may help to clear some suspension systems, depending on the particular installation.
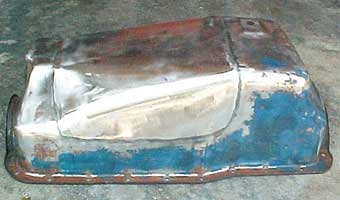
One of the draw backs of the dual sump is the fact that there are two drain plugs involved - one in the front sump and one in the rear. This may or may not be a factor in any given installation, but it created a problem in my TR6 swap. The front plug was located directly above the front cross-member, which would mean that I would have oil dripping off the cross-member onto the floor every time I changed the oil. Not a serious problem, but it's the little things like this that can make the difference between a fun-to-own swap and a pain in the butt!
To get around that problem, and to save a little money, I made my own "rear sump" pan from the dual sump pan I got with the junkyard engine I used for mock-up purposes. To do this, I cut the center out of the pan, made a filler panel out of scrap sheet metal, and had the filler piece welded in place of the piece I cut out. I also had the front drain plug hole welded up, as it would no longer be needed now that the oil from the front sump has a drain path back to the rear sump. I also gained a lot of added oil capacity as well. See for details.
As stated earlier, exhaust headers will be another source of problems, as there are no ready-made headers currently available. None of the available headers will fit without extensive modifications, which run the cost of the conversion up quite a bit if you have to hire the work done.
Clutch actuation may be another problem area, but it's easily solved. From the factory, Ford cars use a cable mechanism to operate the clutch. Duplicating this setup in an MGB or a TR6, for example, can be a bit difficult. Firstly, there is precious little room around the bellhousing to accommodate the cable mechanism. Secondly, it may require quite a bit of creativity to modify the clutch pedal assembly to convert it from hydraulic to mechanical operation. It can be - and has been - done, but it's a bit tricky to do and make it look right. Luckily, there are the old standbys: the hydraulic throw-out bearings that are most often used with BOP/Rover engines.
As you can see, the oil filter sticks almost straight out from the left side of the engine. In an MGB, this oil filter will almost certainly create problems. An easy solution is to use a remote oil filter mount, the same as used often in a BOP/Rover installation. In my TR6, I could leave the oil filter where it is and change it by turning the wheels hard right and reaching in behind the left front wheel to reach it. As easy as this is, I still prefer to use a remote filter mount. This also gives me a good place to put the electric oil pressure sender without giving up the stock oil pressure switch.
For the most part, a 302 entails about the same work as a 215 BOP/Rover. Most of the differences have already been covered, but there are a few other things to be aware of:
The bolt holes for the motor mounts install vertically in the 302, as opposed to horizontally as in the BOP/Rover. This may be an advantage or a disadvantage, depending on your application. On a TR6, it's a definite plus.
The alternator on a Ford engine is usually mounted on the passenger side. The driver's side head is offset a bit to the rear compared to the passenger side, so by mounting the alternator on the driver's side, a little more space can be gained at the front of the engine (if the appropriate pulleys are used, as I did).
The distance from the back of the engine to the gear shift lever on a Ford 302/Ford T5 is 26.5", about the same as the 27" on a BOP/Rover/GMT5. (The Ford bellhousing is 7", the GM 6".) The Ford T5 mounts to the engine at a slight angle, just a few degrees, but the mounting pad is offset so that it remains level when the transmission/engine is installed. Compare this to the 18 degree tilt of the GM T5, and the modification that is required to fit it into a British sports car.
For many British car applications, the Ford 302 is hard to beat. That's not to say that the venerable BOP/Rover engine isn't an excellent choice also. Given the information in this article and the depth of knowledge available for the BOP/Rover, you should be able to make a clear choice for your application.
Disclaimer: This page was researched and written by Dan Masters. Views expressed are those of the author, and are provided without warrantee or guarantee. Apply at your own risk.
With the front sump design, the oil pickup tube is located very near the oil pump and in the front of the pan. This design has the largest depth at the front of the pan, and will probably cause problems with most installations. The rear sump pan has the shallowest depth at the front of any pan, but it will still cause problems with many installations, as the pump body is still located at the front of the engine, and still requires a significant depth to clear. The third choice is the dual sump, as shown. In this sump, the pickup is located in the rear, same as for the rear sump, but the pan has a "notch" built into it, which may help to clear some suspension systems, depending on the particular installation.


One of the draw backs of the dual sump is the fact that there are two drain plugs involved - one in the front sump and one in the rear. This may or may not be a factor in any given installation, but it created a problem in my TR6 swap. The front plug was located directly above the front cross-member, which would mean that I would have oil dripping off the cross-member onto the floor every time I changed the oil. Not a serious problem, but it's the little things like this that can make the difference between a fun-to-own swap and a pain in the butt!
To get around that problem, and to save a little money, I made my own "rear sump" pan from the dual sump pan I got with the junkyard engine I used for mock-up purposes. To do this, I cut the center out of the pan, made a filler panel out of scrap sheet metal, and had the filler piece welded in place of the piece I cut out. I also had the front drain plug hole welded up, as it would no longer be needed now that the oil from the front sump has a drain path back to the rear sump. I also gained a lot of added oil capacity as well. See for details.
As stated earlier, exhaust headers will be another source of problems, as there are no ready-made headers currently available. None of the available headers will fit without extensive modifications, which run the cost of the conversion up quite a bit if you have to hire the work done.
Clutch actuation may be another problem area, but it's easily solved. From the factory, Ford cars use a cable mechanism to operate the clutch. Duplicating this setup in an MGB or a TR6, for example, can be a bit difficult. Firstly, there is precious little room around the bellhousing to accommodate the cable mechanism. Secondly, it may require quite a bit of creativity to modify the clutch pedal assembly to convert it from hydraulic to mechanical operation. It can be - and has been - done, but it's a bit tricky to do and make it look right. Luckily, there are the old standbys: the hydraulic throw-out bearings that are most often used with BOP/Rover engines.
As you can see, the oil filter sticks almost straight out from the left side of the engine. In an MGB, this oil filter will almost certainly create problems. An easy solution is to use a remote oil filter mount, the same as used often in a BOP/Rover installation. In my TR6, I could leave the oil filter where it is and change it by turning the wheels hard right and reaching in behind the left front wheel to reach it. As easy as this is, I still prefer to use a remote filter mount. This also gives me a good place to put the electric oil pressure sender without giving up the stock oil pressure switch.
For the most part, a 302 entails about the same work as a 215 BOP/Rover. Most of the differences have already been covered, but there are a few other things to be aware of:
The bolt holes for the motor mounts install vertically in the 302, as opposed to horizontally as in the BOP/Rover. This may be an advantage or a disadvantage, depending on your application. On a TR6, it's a definite plus.
The alternator on a Ford engine is usually mounted on the passenger side. The driver's side head is offset a bit to the rear compared to the passenger side, so by mounting the alternator on the driver's side, a little more space can be gained at the front of the engine (if the appropriate pulleys are used, as I did).
The distance from the back of the engine to the gear shift lever on a Ford 302/Ford T5 is 26.5", about the same as the 27" on a BOP/Rover/GMT5. (The Ford bellhousing is 7", the GM 6".) The Ford T5 mounts to the engine at a slight angle, just a few degrees, but the mounting pad is offset so that it remains level when the transmission/engine is installed. Compare this to the 18 degree tilt of the GM T5, and the modification that is required to fit it into a British sports car.
For many British car applications, the Ford 302 is hard to beat. That's not to say that the venerable BOP/Rover engine isn't an excellent choice also. Given the information in this article and the depth of knowledge available for the BOP/Rover, you should be able to make a clear choice for your application.
Disclaimer: This page was researched and written by Dan Masters. Views expressed are those of the author, and are provided without warrantee or guarantee. Apply at your own risk.


