�

�
MGB GT V8 - TECHNICAL AND SERVICE NOTES
��
collected and republished in BritishV8 Magazine, Volume XVI Issue 2, October 2008
�
�
TORQUE WRENCH SETTINGS
�| ENGINE | lbf ft | kgf m | |
| Main bearing cap bolts - 1 to 4 | 53 | 7,32 | |
| Main bearing cap bolts - rear | 68 | 9,40 | |
| Connecting rod cap nuts | 33 | 4,65 | |
| Cylinder head bolts | 68 | 9,40 | |
| Rocker shaft bolts | 28 | 3,87 | |
| Flywheel bolts | 55 | 7,60 | |
| Oil pump cover bolts | 13 | 1,80 | |
| Oil pressure relief valve plug | 33 | 4,56 | |
| Timing chain cover bolts | 23 | 3,18 | |
| Crankshaft pulley bolt | 150 | 20,73 | |
| Distributor drive gear to camshaft bolt | 43 | 5,94 | |
| Exhaust manifold bolts | 13 | 1,80 | |
| Induction manifold bolts | 28 | 3,87 | |
| Induction manifold gasket clamp bolts | 13 | 1,80 | |
| Carburetter adapter nuts | 18 | 2,49 | |
| Important: As the V8 engine is fitted with a cast aluminum cylinder � block it is of critical importance to adhere to the specified tightening torque for all bolts. � It is equally important to maintain the designed thread engagement lengths, otherwise irreparable� damage may be done to the cylinder block. Always use bolts of the correct length and where � specified use the thread lubricant and sealer. | |||
| REAR AXLE | |||
| Crown wheel bolts | 63 | 8,70 | |
| Differential bearing cap bolts | 53 | 7,32 | |
| Pinion bearing nut (new spacer only) | 200 | 27,64 | |
| Half shaft nut | 150 | 20,73 | |
| REAR SUSPENSION | |||
| Shock absorber to side member nut | 58 | 8,01 | |
| FRONT SUSPENSION | |||
| Bottom wishbone pivot to crossmember nut | 45 | 6,22 | |
| Front shock absorber to crossmember bolt | 44 | 6,08 | |
| Crossmember to side member nut - top | 55 | 7,60 | |
| Crossmember to side member nut - bottom | 45 | 6,22 | |
| STEERING | |||
| Column clamp bolt | 85 | 0,98 | |
| Wheel nut | 28 | 3,87 | |
| Column universal joint nut | 21 | 2,90 | |
| Rack to tie rod ball joint nut | 35 | 4,84 | |
| ROAD WHEELS | |||
| Stud nut | 60 | 8,30 | |
TECHNICAL DATA
�| ENGINE | ||
| Unit type | V8 | |
| No. of cylinders | Eight, two banks of four | |
| Capacity | 215.54 in.3 (3 532 cm3) | |
| Bore | 3.50 in. (88,9 mm) | |
| Stroke | 2.80 in. (71,12 mm) | |
| Firing order | 1 - 8 - 4 - 3 - 6 - 5 - 7 - 2 | |
| Cylinder numbering - left bank | 1 - 3 - 5 - 7 (front to rear) | |
| Cylinder numbering - right bank | 2 - 4 - 6 - 8 (front to rear) | |
| Cranking pressure | 155 lbf/in2 (109 kgf/cm2) at 200 rev/min | |
| Compression ratio | 8.26 : 1 | |
| Torque | 193.0 lbf/in (26,33 kgf m) at 2,900 rev/min | |
| Engine idle speed | 800 to 850 rev/min | |
| Fast idle speed | 1 400 to 1 500 rev/min | |
| Valve operation | Overhead by push rod | |
| B.H.P. | 137 at 5000 rev/min din | |
| FUEL | ||
| Recommended octane rating | 97 RON (Research octane number) minimum | |
| CRANKSHAFT | ||
| Main journal dia. | 2.2992 to 2.2997 in. (58,40 to 58,41 mm) | |
| Crankpin journal dia. | 2.000 to 2.0005 in. (50,80 to 50,81 mm) | |
| Undersizes (mains and crankpin) | 0.100 in. 0.020 in. 0.030 in. 0.040 in. | |
| (0,25 mm) (0,51 mm) (0,76 mm) (1,02 mm) | ||
| Crankshaft end float | Taken on No. 3 main bearing | |
| Crankshaft Regrind | 0.004 to 0.008 in. (0,10 to 0,20 mm) | |
| MAIN BEARING | ||
| Number and type | 5 thin wall | |
| Length - Nos. 1,2,4 & 5 | 0.791 to 0.807 in. (20,12 to 20,50 mm) | |
| Length - No. 3 | 1.056 to 1.058 (26,82 to 26,87 mm) | |
| Diametrical clearance | 0.0004 to 0.0021 in. (0,01 to 0,05 mm) | |
| CON RODS | ||
| Type | Horizontally split big end, plain small end. | |
| Length between centres | 5.658 to 5.662 in. (143,71 to 143,81 mm) | |
| End float on crankpin | 0.006 to 0.014 in. (0,15 to 0,36 mm) | |
| Small end dia. | 0.8734 to 0.8739 in. (22,184 to 22,187 mm) | |
| BIG END BEARING | ||
| Type | Thin wall | |
| Length | 0.687 to 0.702 in. (17,45 to 17,83 mm) | |
| Diametrical clearance | 0.0006 to 0.0023 in. (0,02 to 0,06 mm) | |
| GUDGEON PIN | ||
| Type | Press fit in connecting rod | |
| Dia. (outer) | 0.8745 to 0.8748 in. (22,21 to 22,22 mm) | |
| Fit to piston | 0.0002 to 0.0004 in. (0,005 to 0,010 mm) | |
| Fit in con. rod | Interference | |
| Gudgeon Pin Torque | 12 lbs/ft | |
| PISTONS | ||
| Type | Aluminum alloy, concave top | |
| Clearance - top of skirt | 0.0019 to 0.0025 in. (0,05 to 0,06 mm) | |
| Clearance - bottom of skirt | 0.0007 to 0.0013 in. (0,02 to 0,03 mm) | |
| Oversizes available | 0.010 in. (0,25 mm) 0.020 in. (0,51 mm) | |
| Width of groove - top | 0.081 to 0.082 in. (2,06 to 2,08 mm) | |
| Width of groove - second | 0.081 to 0.082 in. (2,06 to 2,08 mm) | |
| Width of groove - third | 0.1885 to 0.1895 in. (4.79 to 4.81 mm) | |
| Gudgeon pin bore | 0.8748 to 0.8751 in. (22,22 to 22,23 mm) | |
| Piston grading | A - 0.0003"-0006" | |
| B - 0.0006"-0009" | ||
| C - 0.0009"-0012" | ||
| D - 0.0023"-0015" | ||
| PISTON RINGS | ||
| Compression | 2 | |
| Top ring | Tapered, chrome faced | |
| Second ring | Tapered | |
| Fitted gap | 0.017 to 0.022 in. (0,43 to 0,56 mm) | |
| Groove clearance - top | 0.002 to 0.0035 in. (0,05 to 0,09 mm) | |
| Groove clearance -second | 0.002 to 0.003 in. (0,05 to 0,08 mm) | |
| Oil control | 1 | |
| Type | Two chrome faced rings with spacer | |
| Fitted gap - rings | 0.015 to 0.055 in. (0,38 to 1,40 mm) | |
| Fitted gap -spacer | 0.521 to 0.589 in. (13,24 to 14,95 mm) | |
| CAMSHAFT | ||
| Valve timing marks | Dimples on crankshaft and camshaft sprockets | |
| Adjustment | Non adjustable | |
| Valve timing mark | Valve 0.004 in. (0,10 mm) off seat at timing point. | |
| Inlet opens | 30 degrees BTDC | |
| Inlet closes | 75 degrees ABDC | |
| Exhaust opens | 68 degrees BBDC | |
| Exhaust closes | 37 degrees ATDC | |
| Bearings | 5 - thin wall | |
| Journal dia. front | 1.785 to 1.786 (45,34 to 45,36 mm) | |
| Journal dia. second | 1.755 to 1.756 (44,58 to 44,60 mm) | |
| Journal dia. third | 1.725 to 1.726 (43,82 to 43,84 mm) | |
| Journal dia. fourth | 1.695 to 1.696 (43,06 to 43,08 mm) | |
| Journal dia. fifth | 1.665 to 1.666 (42,29 to 42,32 mm) | |
| Diametrical clearance - front | 0.0005 to 0.0025 (0,01 to 0,06 mm) | |
| Diametrical clearance - rest | 0.0005 to 0.0035 (0,01 to 0,09 mm) | |
| TIMING CHAIN | ||
| Type | Inverted tooth | |
| Pitch and number of pitches | 0.375 in. (9,52 mm) pitch x 54 | |
| Controlled by | Chain design | |
| TAPPETS | ||
| Type | Hydraulic, non adjustable (not serviceable) | |
| Diametrical Clearance | 0.0008 to 0.0023 in. (0,02 to 0,06 mm) | |
| CYLINDER HEAD | ||
| Valve seat angle | 46 degrees + one quarter degree | |
| VALVES | ||
| Inlet: Face angle | 45 degrees + one quarter degree | |
| Inlet: Head diameter | 1.495 to 1.505 in. (37,97 to 38,23 mm) | |
| Inlet: Stem diameter from head... | 0.3402 to 0.3412 in. (8,64 to 8,67 mm) | |
| ...increasing to | 0.3407 to 0.3417 in. (8,65 to 8,68 mm) | |
| Inlet: Stem to guide clearance, top | 0.001 to 0.003 (0,03 to 0,08 mm) | |
| Inlet: Stem to guide clearance, bottom | 0.0005 to 0.0025 in. (0,01 to 0.06 mm) | |
| Lift | 0.39 in. (10,0 mm) | |
| Exhaust: Face angle | 45 degrees + one quarter degree | |
| Exhaust: Head diameter | 1.3075 to 1.3175 in. (33,21 to 33,47 mm) | |
| Exhaust: Stem diameter from head... | 0.3397 to 0.3407 in. (8,63 to 8,65 mm) | |
| ...increasing to | 0.3402 to 0.3412 in. (8,64 to 8,67 mm) | |
| Exhaust: Stem to guide clearance, top | 0.0015 to 0.0035 in. (0,04 to 0,09 mm) | |
| Exhaust: Stem to guide clearance, bottom | 0.002 to 0.004 in. (0,05 to 0,10 mm) | |
| Lift | 0.39 in. (10,0 mm) | |
| VALVE ROCKERS | ||
| Shaft diameter | 0.8092 to 0.8099 in. (20,55 to 22,57 mm) | |
| Arm bore diameter | 0.812 to 0.813 in. (20,62 to 20,65 mm) | |
| Ratio | 1.56 : 1 | |
| VALVE GUIDES | ||
| Length | 2.600 in. (66,04 mm) | |
| Outer diameter | 0.5942 to 0.5952 in. (15,09 to 15,12 mm) | |
| Inner diameter | 0.3427 to 0.3437 in. (8,70 to 8,73 mm) | |
| Fitted height | 0.745 in. (18.92mm) | |
| Interference fit in head | 0.0015 to 0,0035 in. (0,04 to 0,09 mm) | |
| VALVE SPRINGS | ||
| Free length, inner | 1.919 in. (48,74mm) | |
| Free length, outer | 2.068 in. (52,53 mm) | |
| Fitted length, inner | 1.630 in. (41,40 mm) | |
| Fitted length, outer | 1.600 in. (40,64 mm) | |
| Load to compress... | ||
| ...to fitted length, inner | 24 +/- 2.5 lbf (10 +/- 1,14 kgf) | |
| ...to fitted length, outer | 42 +/- 3 lbf (19,1 +/- 1,36 kgf) | |
| ENGINE LUBRICATION | ||
| System type | Wet sump, pressure fed. | |
| System pressure, running | 42 lbf/in2 (2,95 kgf/cm2) | |
| System pressure, idling | 34 lbf/in2 (2,39 kgf/cm2) | |
| OIL PUMP | ||
| Type | Gear | |
| OIL FILTER | ||
| Type | Full flow | |
| By-pass valve opens | 8 to 12 lbf/in2 (0,56 to 0,84 kgf/cm2) | |
| PRESSURE RELIEF VALVE | ||
| Free length | 3.20 in. (81,30 mm) | |
| Fitted length | 1.80 in. (45,70 mm) | |
| Load at fitted length | 9.3 +/- 0.5 lbf (4,22 +/- 0,23 kgf) | |
| CAPACITY ENGINE | ||
| Including filter | 8 Imp pints - 4,54 litres | |
| Filter | 1/2 pint - 0,28 litres | |
| COOLING SYSTEM | ||
| Type | Pressurized spill return system with thermostat control, pump and fan assisted. | |
| Pump | Centrifugal | |
| Thermostat | Wax element | |
| Thermostat temperature | 82 degrees C | |
| Pressure cap | 15 lbf/in2 (1,05 kgf/m2) | |
| Capacity with heater | 16 pints (9,1 litres) | |
| Fan | Twin electric | |
| Anti-freeze | Bluecol type AA | |
| Thermostatic fan cut-in | 88 degrees | |
| Thermostatic fan cut-out | 92 degrees | |
| FUEL SYSTEM | ||
| Tank capacity | 12 gallons | |
| Carburettor | S.U. HIF6 | |
| Damper | 0.070 in. | |
| Jet size | 0.100 in. (2,54 mm) | |
| Needle | BBU | |
| Piston spring | Yellow | |
| Air cleaners | Paper element type with air temperature control | |
| Fuel pump | S.U. electric AUF 305 | |
| IGNITION DETAILS | ||
| Timing marks | Pointer on timing case and degree marks on crankshaft pulley. | |
| Distributor | ||
| Make/type | Lucas 35 D8 | |
| Serial number | 41394 | |
| Rotation of rotor | Anti-clockwise | |
| Dwell angle | 26 to 28 degrees | |
| Contact breaker gap | 0.014 to 0.016 in. (0,35 to 0,40 mm) | |
| Condenser capacity | 0.18 to 0.24 microfarad | |
| Centrifugal advance (decelerating with vacuum pipe disconnected) | ||
| 33 to 37 degrees at 4900 rev/min | ||
| 28 to 32 degrees at 3600 rev/min | ||
| 24 to 28 degrees at 2600 rev/min | ||
| 19 to 23 degrees at 2000 rev/min | ||
| 14 to 18 degrees at 1600 rev/min | ||
| 9 to 13 degrees at 1200 rev/min | ||
| No advance below | 600 rev/min | |
| Vacuum advance | 16 degrees | |
| Vacuum advance - starts | 5 in. (127 mm) Hg. | |
| Vacuum advance - finishes | 17 in. (432 mm) Hg. | |
| Stroboscopic timing | 8 degrees BTDC at 1000 rev/min | |
| Spark Plugs | ||
| Make/type | Champion L92Y | |
| Gap | 0.035 in. (0,90 mm) | |
| Coil | ||
| Make/type | Lucas 16C6 with ballast resistor | |
| Primary resistance at 20C (68F) | 1.2 to 1.4 ohms | |
| Consumption - ignition on at 2000rpm | 1 amp | |
| CLUTCH | ||
| Type | Borg & Beck, 9.5 in. (DS.45 SF) | |
| Diaphragm spring colour | Red on two fingers | |
| Number of damper springs | 6 | |
| Damper spring colour | Brown/cream | |
| Clutch release | Ball bearing | |
| Master cylinder diameter | 0.70 in. (17,78 mm) | |
| Slave cylinder diameter | 1.0 in. (25,40 mm) | |
| Fluid | Unipart 550 | |
| GEARBOX AND OVERDRIVE | ||
| Forward gears | Four (all synchromesh) | |
| Ratios | Gearbox | Overall | |
| Reverse | 2.819 : 1 | 8.657 : 1 | |
| First | 3.138 : 1 | 9.637 : 1 | |
| Second | 1.974 : 1 | 6.062 : 1 | |
| Third | 1.259 : 1 | 3.866 : 1 | |
| Fourth | 1.000 : 1 | 3.071 : 1 | |
| Overdrive | 0.82 : 1 | 2.518 : 1 | |
| Road speed in top gear - direct | 23 m.p.h. (per 1000 rev/min) | |
| Road speed in top gear - overdrive | 28 m.p.h. (per 1000 rev/min) | |
| Speedometer gear ratio | 8/21 | |
| Overdrive type | Laycock LH | |
| PROPELLER SHAFT | ||
| Type | Tubular with Hardy Spicer joints | |
| FINAL DRIVE | ||
| Type | Hypoid, semi floating | |
| Ratio | 3.071 : 1 (14/43) | |
| Differential bearing preload | 0.002 in. (0,05 mm) "nip" per bearing | |
| Backlash adjustment - crown wheel | Spacers | |
| Backlash adjustment - pinion | Head washer | |
| STEERING | ||
| Type | Rack and pinion | |
| Steering wheel diameter | 15.5 in. (394 mm) | |
| Turns - lock to lock | 2.93 | |
| Turning circle: left lock | 34 ft. (10,36 m) | |
| Turning circle: right lock | 33 ft. 1 in. (10,08 m) | |
| Pinion end float | 0.002 to 0.005 in. (0,05 to 0,12 mm) | |
| Damper end float | 0.0005 to 0.003 in. (0,01 to 0,08 mm) | |
| Toe-in | 1/16 to 3.32 in. (1,6 to 2,4 mm) | |
| FRONT SUSPENSION | ||
| Type | Independent. Coil spring and wishbone. | |
| Spring - coil diameter (mean) | 3.238 in. (82,2 mm) | |
| Spring - free height | 9.32 +/- 0.06 in. (236,7 +/- 1,5 mm) | |
| Spring - static length | 6.84 in. (173,7 mm) at 1193 lbf (540.1 kgf) | |
| Spring - number of free coils | 7.2 | |
| Camber angle | Nominal 1 degree positive (+ 0.5 degrees, - 1.5 degrees) | |
| Caster angle | Nominal 7 degrees (+ 0.25 degrees, - 2 degrees) | |
| King pin inclination | Nominal 8 degrees (+ 1 degree, - 0.75 degrees) | |
| Dampers | Armstrong, lever arm, hydraulic | |
| Damper arm centres | 8 in. (203,2 mm) | |
| REAR SUSPENSION | ||
| Type | Semi-elliptic leaf spring | |
| Number of spring leaves | 6 plus bottom plate, | |
| Interleaving 1/2, 2/3, 3/4, 4/5. | ||
| Width of springs | 1.75 in. (44,4 mm) | |
| Gauge of leaves | 3 at 7/32 in. (5,6 mm), 3 at 3/16 in. (4,8 mm) | |
| Working load | 550 lb (249,7 kg) | |
| Dampers | Armstrong, lever arm, hydraulic | |
| Damper arm centres | 5.25 in. (133 mm) | |
| BRAKES | ||
| Type | Lockheed hydraulic, disc front, drum rear, servo assisted. | |
| Master cylinder diameter | 0.75 in. (19,05 mm) | |
| Servo type | Remote type 6 | |
| Front - caliper piston diameter | 2.125 in. (53,98 mm) | |
| Front - pad area (total) | 24 in2 (3,72 cm2) | |
| Front - disc diameter | 10,70 in. (271,78 mm) | |
| Front - pad material | F2241 (Unipart GBP 212) | |
| Rear - wheel cylinder diameter | 0.80 in. (20,32 mm) | |
| Rear - lining area (total) | 67.2 in2 (10,42 cm2) | |
| Rear - drum diameter | 10.0 in. (254 in.) | |
| Rear - surface width | 1.75 in. (44,45 mm) | |
| Rear - lining material | GBS 602 Lining material MA1 | |
| WHEELS | ||
| Size | 5J x 14 | |
| TYRES | ||
| Size and type | 175 HR - 14, tubeless, radial | |
| ELECTRICAL EQUIPMENT | ||
| System | 12 volt, negative earth | |
| Batteries (two six volt) | CA 11/9E or CAZ11/9E | |
| Capacity : 10 hour rate | 53 Ah | |
| Capacity : 20 hour rate | 60 Ah | |
| Plates per cell | 9 | |
| Electrolyte to fill one cell | 1 pint (570 cm3, 1.2 U.S. pints) | |
| Fuses | 35A (blow rating) | |
| Alternator | ||
| Type | A.C. Delco 7982707 | |
| Output at 14.2V and 5000 rev/min | 46A | |
| Brush length (minimum) | 0.25 in. (6,3 mm) | |
| Brush spring tension | 8 to 13 ozf (227 to 369 gf) | |
| Starter Motor | ||
| Make and type | Lucas 3M100 Pre-engaged | |
| Wiper Motor | ||
| Make and type | Lucas, two speed | |
| Horns | ||
| Make and type | Lucas 9H | |
| Maximum current consumption | 3.5 to 4 amp | |
| GENERAL DIMENSION | ||
| Overall width | 4 ft 11 15/16 in. (152,3 cm) | |
| Overall height | 4 ft 1 31/32 in. (126,9 cm) | |
| Track - front | 4 ft 1 in. (124.4 cm) | |
| Track - rear | 4 ft 1.25 in. (125 cm) | |
| Wheelbase | 7 ft 7.135 in. (231,5 cm) | |
| Ground clearance (unladen) | 4.25 in. (108 mm) | |
| CAPACITIES | ||
| Fuel tank | 12 gal (54 litres) | |
| Cooling system | 16 pt. (9,1 litres) | |
| Steering rack | 1/3 pt. (0,18 litre) | |
| Engine - with filter | 8 pt. (4,54 litres) | |
| Filter | 1/2 pt. (0,28 litre) | |
| Gearbox and overdrive | 6 pt. (3,4 litres) E.R.90 | |
| Rear axle | 1 1/2 pt. (0,85 litre) | |
�
Enjoying this article? Our magazine is funded through the generous support of readers like you!
�
To contribute to our operating budget, please click here and follow the instructions.
�
(Suggested contribution is twenty bucks per year. Feel free to give more!)�
MGB GT V8 ENGINE
� �
GENERAL DESCRIPTION�
�
The cylinder block is cast aluminum fitted with cylinder liners. It has two �
banks of four cylinders each, which form a 90 degree angle.�
�
The crankshaft is supported by five bearings. The thrust is taken by the centre �
main bearing. Connecting rods are forged steel, and aluminum alloy pistons are �
used. These are fitted with two compression and one oil control ring above the �
gudgeon pin which is semi-floating (press fit). �
�
Cylinder heads are also aluminum castings. Iron valve seat inserts and valve �
guides are used. The valves are arranged in line and operate at an angle of �
10 degrees above the cylinder bore center line. The camshaft is located between �
the two banks of cylinders, above the crankshaft, and runs in five bearings. �
It is driven at half the crankshaft speed by an inverted tooth type chain. No �
chain tensioner is provided. �
�
The valves are operated by means of hydraulic tappets which ensure quiet engine �
running and maintain adjustment at the correct clearance. �
�
Lubrication of the engine is by means of a pressure fed oil system, which �
incorporates an oil pump located in the timing cover, and an external full �
flow oil filter.�
�
Product Training (Cars)�
�
June 1973�
MGB-GT V8 ENGINE - GENERAL DETAILS
�ROCKER SHAFTS
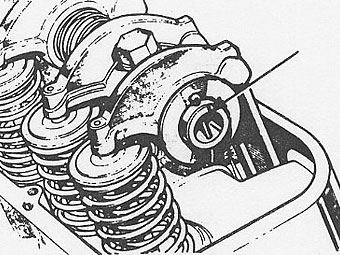
�� Before removing the rocker shafts, note the position of the notch, � arrowed, in the end face of each shaft. This notch must be uppermost and � towards the front of the engine on the right hand side and towards the � rear on the left hand side. After removing rocker shaft assemblies, withdraw � the pushrods and tappets and retain in the sequence removed.�
��
 �
�
�
INSPECTION OF HYDRAULIC TAPPETS AND PUSHRODS
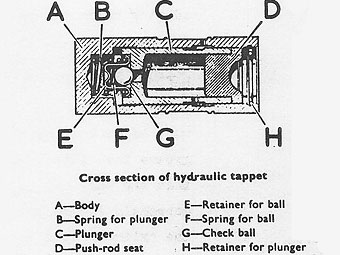
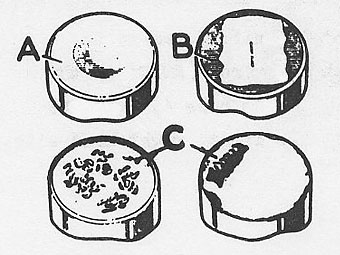
�� The tappets are non-serviceable. Replace tappet assembly if body is roughly � scored or grooved, or has a blow hole extending through the wall in a position � to permit leakage of oil from lower chamber of tappet. Inspect the cam contact � surface of the tappets. Tappets must rotate and a circular wear pattern � (as shown at "A") is normal. A non-rotating tappet will show wear as in the � illustration (at "B"). Replace tappet and ensure that it is free to revolve � in the cylinder block. "C" shows excessive wear of surface, and the tappet � should be replaced. Pushrods, can be fitted either way round when new, but � after use the rocker end of the rod becomes polished and should be retrofitted � in the original position �
�NOTE
�� It should be noted that tappet noise can be expected on initial starting up � after an overhaul due to oil drainage from the tappet assemblies or if the � vehicle has been standing over a very long period. If excessive noise should � be apparent alter an overhaul, the engine should be run at approximately 2500 � rev/min for a few minutes when the noise should be eliminated.�
��
 �
�
�
INLET MANIFOLD
��
The inlet manifold is a one piece aluminium casting. This also contains water �
passages through which coolant circulates from the cylinder heads.�
�
Also housed in the manifold is the thermostat, thermal transmitter for the �
temperature gauge, and the thermal switch which controls the electrically �
driven cooling fans.�
�
A carburetter adaptor is mounted on the inlet manifold. This adaptor holds the �
carburetters, which are mounted at the rear of the engine.�
�
Before refitting the inlet manifold, new gasket seals should be fitted. These �
must be smeared on both sides with silicon grease, then fitted in position �
ensuring that the ends of the seals are fitted correctly in the notches formed �
between the cylinder head and cylinder block. �
�
Apply Hylomar sealing compound "SQ 32M" on the four corners of the cylinder �
head, inlet manifold gasket, and inlet manifold, around the water passage joints.�
�
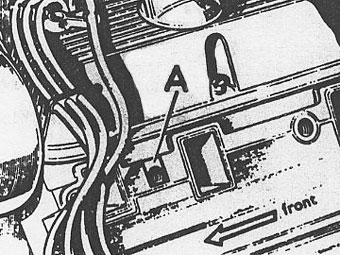
Place the inlet manifold gasket in position with the word 'FRONT' to the front, �
the open bolt hole 'A' will be positioned to the front, right band side. �
�
Fit the gasket clamps and bolts but do not fully tighten at this stage.�
�
Position the inlet manifold on the cylinder heads and connect up the water hoses.�
�
Fit all bolts into the cylinder heads, using a little EC 776 lubricant/sealant. �
Note: The two longer bolts are installed at the front.�
�
As the bolt holes are not at right angles to the inlet manifold's cylinder head �
faces, there may be an illusion of misalignment. Tighten all the manifold to �
cylinder head bolts a little at a time. Tighten evenly, alternating sides working �
from centre of engine to each end.�
�
Finally tighten to a torque figure of 3,5 - 4,0 kgf m (25 - 30 lbf ft) following �
the sequence detailed above. �
�
The clamp bolts at the front and rear of the gasket can now be tightened to a �
torque figure of 1,4 - 2,0 kgf m (10 - 15 lbf ft). �
�
 �
�
�
REFITTING EXHAUST MANIFOLD
� �
It is essential that the following procedure is adopted. Locate the exhaust �
manifold on the engine. (No gasket is used.) Fit the fixing bolts, after coating �
with Loctite 40.�
�
Tighten to torque figure 2,0 kgf m (15 lbf ft).�
�
Do not overtighten at this stage.�
�
After engine has run for a minimum of five minutes, torque settings should be �
rechecked. (The above procedure allows for "creep" due to different rates of �
expansion of dissimilar metals.) �
CYLINDER HEAD
��
If both cylinder heads are being removed, mark them relative to LH and RH sides �
of the engine to ensure that they are refitted in their original position. �
�
NOTE On stripping an engine, the cylinder head bolts should be immediately �
wire brush washed in 3M solvent No 2. If the bolts cannot be cleaned as soon as �
they are removed, it is essential that they be stored in a bath of trichloroethylene, �
petrol or paraffin etc., which may also be used as a cleaner if 3M solvent No. 2 �
is not available, otherwise the sealant used on previous assembly will tend to �
air harden making subsequent removal very difficult. �
�
Fit new cylinder head gaskets with the word 'TOP' uppermost.�
�
Do not use any sealant as the gaskets are already coated with a lacquer. Before �
refitting the cylinder head bolts, the threads should be cleaned, then coated �
with thread lubricant sealant 3M EC776.�
�
Damage to the aluminium cylinder block threads can result if bolts are not �
lubricated with 'EC 776' prior to installation. A false torque reading may �
also be obtained.�
�
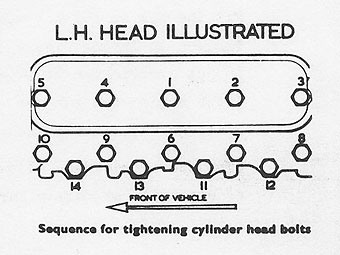
Locate the cylinder head bolts in position:
�
Long bolts 1, 2 & 4,
�
Medium bolts 3, 5, 6, 7, 8, 9 & 10, and
�
Short bolts 11, 12, 13 & 14.
�
�
Tighten the bolts a little at a time in the sequence shown. Final torque: �
9,0 to 9,6 kgf m (65 to 70 lbf ft). Uneven tightening of the cylinder head �
bolts can cause distortion of the cylinder bores, causing compression loss �
and excessive oil consumption, �
�
CAUTION Any attempt to salvage the sparking plug threads in the cylinder �
head may result in breaking into the water jacket, rendering the head scrap.�
�
Cylinder heads must not be refaced, as this will affect the fit of the induction �
manifold and also the operation of the hydraulic tappets.�
CYLINDER HEAD OVERHAUL
��
Use particular care to protect gasket surfaces of cylinder heads.�
�
After removing valves, clean with a soft wire brush. Avoid scratching �
the aluminium combustion chambers and valve seats. �
�
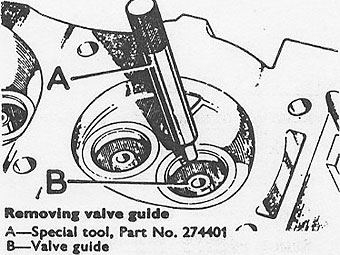
If valve guides need replacing, they should be driven out using tool No. 274401.�
�
Service valve guides are 0,025 mm (0.001 in.) larger on the outside diameter in �
order to obtain a good fit in the cylinder head.�
�
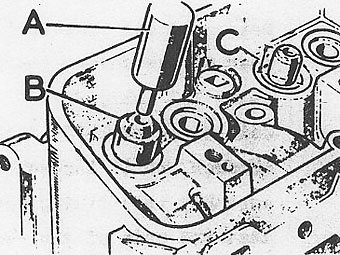
Lubricate and install new guide from top of head using special tool No. 600959 �
'A' and distance piece part No, 605774 'B'. �
�
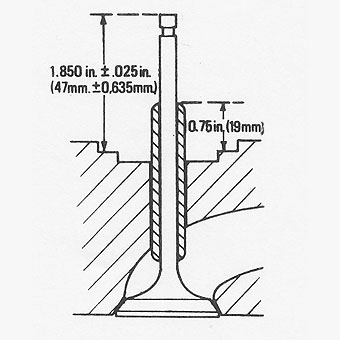
The tool is designed to bottom when the guide is correctly positioned. The �
fitted guide should stand 19 mm (3/4 in.) above the step surrounding the valve �
guide boss in the cylinder head. See illustration "C". �
�
Valve seat inserts are replaceable. For details see Repair Operation manual. �
Correct valve seat angle 46 degree + degree. Correct valve face angle is 45 �
degrees.�
�
Improper hydraulic tappet operation may result if valve and seat are refinished �
to the extent that the valve stem is raised more than 1,27 mm (0.050 in.) above �
normal height. In this case, it will be necessary to grind off the end of the �
valve stem or replace parts. The normal height of the valve stem above the outer �
valve spring seat surface of the head is 47 mm (1.850 in.) + 0,635 mm (0.025 in.) �
�
 �
�
�
TIMING GEAR C0VER
��
Remove crankshaft pulley.�
�
Mark the distributor body relative to the center line of the rotor arm. If the �
distributor is to be removed, make corresponding marks on the distributor and �
timing cover. Remove timing cover bolts, including two from the sump, and remove �
timing cover complete. �
�
 �
�
�
TIMING COVER OIL SEAL REPLACEMENT
��
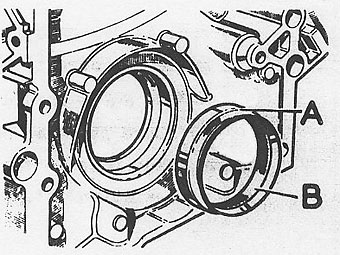
Drive out oil thrower 'A' towards the rear of the cover. (It may be pulled out �
using 18G 1087.) �
�
Coil a new seal "B" into a new oil thrower, refit thrower and seal assembly into �
timing cover, ensuring that the ends of the seal are at the top.�
�
Stake the thrower in place by use of a small chisel at three equidistant points. �
Rotate a hammer shaft around the inside of the seal until the crankshaft pulley �
can be inserted. �
�
 �
�
�
REFITTING TIMING COVER
� �
Fit new cover joint washer. �
�
If distributor is in cover, set the rotor arm approximately 30 degrees before the �
final positioning mark, to compensate for skew gear engagement.�
�
Locate timing cover in position.�
�
Clean the threads of the cover securing bolts and then coat them with thread �
lubricant - sealant 3M EC 776.�
�
Fit cover bolts and tighten to 2,8 - 3,5 kgf m (20 to 25 lbf ft). �
�
Fit crankshaft pulley torque 19,3 to 22,3 kgf m (140 - 160 lbf ft). �
CAMSHAFT
��
The camshaft is positioned centrally in the cylinder block and is supported by �
five bearings.�
�
CAUTION: Do not damage the bearings when withdrawing the camshaft as the �
camshaft bearings are not serviceable.�
TIMING CHAIN AND GEARS
��
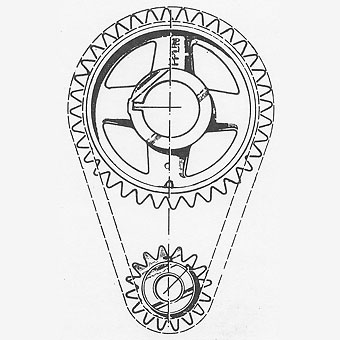
An inverted tooth type chain is fitted in conjunction with a sintered iron crankshaft �
gear. The camshaft gear is made of aluminum alloy. The teeth are covered with nylon.�
�
CAUTION: DO NOT rotate the engine after chain is removed if rocker shafts �
are fitted, otherwise the valve gear and pistons will be damaged. �
REFITTING TIMING CHAIN AND GEARS
� �
Remove the rocker shafts. Set the engine with the "number one piston" at TDC.�
�
Temporarily fit the camshaft gear with the camshaft gear with the marking "FRONT" �
outward. (If the gear is not marked, the chamfer should be fitted towards the engine.)�
�
Turn the camshaft until the mark on the gear is at the six o'clock position, then �
remove the gear without disturbing the camshaft setting. Locate the timing gears �
onto the chain with the timing marks aligned. �
�
Engage chain and gears onto camshaft and crankshaft key locations. �
�
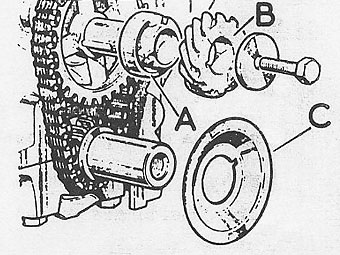
Check that timing marks are in line. Fit the fuel pump cam "A" with "F" marking �
outward. (Note: It's used as a spacer only.) Fit the distributor drive "B", �
washer and bolt, and oil thrower, concave side outwards "C". �
CONNECTING RODS AND PISTONS
��
Connecting rods have horizontally split big ends and plain small ends. �
�
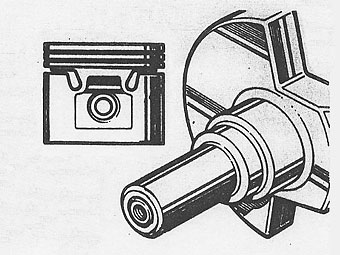
Pistons are of aluminium alloy with "W" slot skirt. These pistons must always �
be used with a crankshaft having an identification groove in the face at the �
starter dog end. �
�
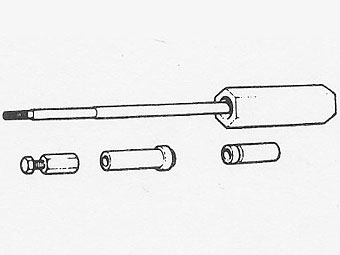
The piston gudgeon pins are a press fit in the small end of the connecting rod, �
known as semi-floating and are removed and refitted using tool No. 18G 1150 �
with adaptor 180 1150E.�
�
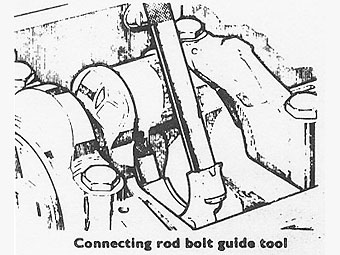
After removing a connecting rod cap, screw guide bolts (part No 605351) onto �
the connecting rod. �
�
Push the connecting rod and piston assembly up the cylinder bore and withdraw �
it from the top. �
�
 �
�
�
REFITTING
� �
Turn the applicable crankshaft journal to BDC. �
�
Place the bearing upper shell in the connecting rod.�
�
Retain shell by screwing guide bolts onto the connecting rod.�
�
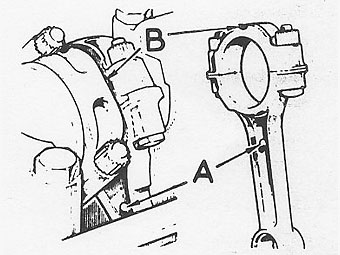
Insert the connecting rod and piston assembly into its respective bore, noting �
that the domed boss on connecting rod ("A" on the illustration) and bearing cap �
("B") must face towards the front of the engine on the right �
hand bank of cylinders and towards the rear on the left hand bank.�
�
When both connecting rods are fitted, the bosses will face inwards towards each �
other. �
�
 �
�
�
BIG END BEARINGS
� �
The fit of bearings to crankshaft is checked using Plastigauge - type PG-1 - �
part No. 605238.�
�
Place a piece of Plastigauge across the centre of the lower half of the crankshaft �
journal, illustration "A". Locate the bearing cap and shell to the connecting rod.�
�
Tighten the connecting rod cap nuts to torque figure 4,0 to 4,9 kgf m (30 to �
35 lbf ft). �
�
NOTE: DO NOT rotate the crankshaft while the Plastigauge is fitted. �
�
Remove the bearing cap and shell.�
�
Using the scale printed on the Plastigauge packet, measure the flattened �
Plastigauge at its widest point - illustration "B".�
�
The graduation that most closely corresponds to the width of the Plastigauge �
indicates the bearing clearance.�
�
The correct bearing clearance with new or overhauled components is 0,015 to �
0,055 mm (0,0006 to 0.0022 in.). �
�
If a bearing has been in service it is advisable to fit a new hearing if the �
clearance exceeds 0,08 mm (0.003 in.). �
�
Wipe off the Plastigauge with an oily rag. DO NOT SCRAPE IT OFF. �
CRANKSHAFT
��
Supported by five main bearings. �
�
End-float 0,10 to 0,20 mm (0.004 to 0.008 in.) controlled by flanged centre �
main bearing.�
�
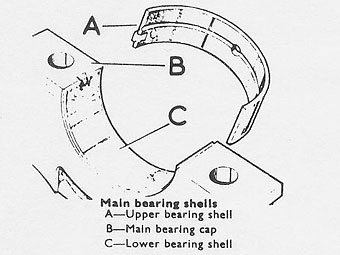
NOTE: If the same bearing shells are to be refitted, retain them in pairs �
and mark them with the number of the respective journal. �
�
Care must be taken when refitting main bearing shells regarding position in �
bearing. The shells with the oil drilling and oil grooves must be fitted to �
the cylinder block.�
�
Main bearing clearance is checked using Plastigauge as detailed in connecting �
rod section of Student's Technical Notes. �
�
 �
�
�
CRANKSHAFT REAR OIL SEAL
� �
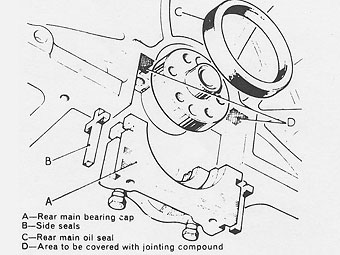
A lip type seal is fitted into a recess formed by the cylinder block and the �
rear main bearing cap.�
�
Bearing cap side seals of cruciform design are fitted into grooves in the sides �
of the cap. Illustration "B".�
FITTING NEW REAR OIL SEAL
��
Fit new side seals to the grooves each side of the bearing cap. DO NOT �
cut the side seals to length, they must protrude 1,5 mm (0.062 in.) approximately �
above the bearing cap parting face.�
�
Apply Hylomar PL 32M (Unipart No. GGC 102) to the rearmost half of the rear main �
bearing cap parting face or, if preferred, to the equivalent area on the cylinder �
block as illustrated at "D".�
�
Lubricate the bearing shell and bearing cap side seals with clean engine oil.�
�
Fit the bearing cap assembly to the cylinder block.�
�
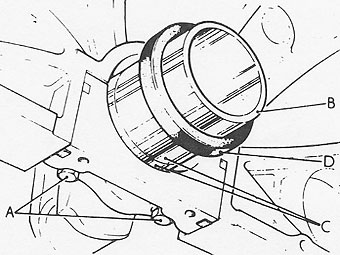
Do not tighten the fixings at this stage, but ensure that the cap is fully home �
and squarely seated or the cylinder block. Tension the cap bolts "A" equally by �
one quarter turn approximately, then back off one complete turn on each bolt.�
�
Position the seal guide tool ("B") part No. R.O. 1014 on the crankshaft flange.�
�
Ensure that the oil seal guide and the crankshaft journal are clean, then coat �
the seal guide and oil seal journal "C" with clean engine oil.�
�
CAUTION: Do not handle the seal lip at any time, visually check that �
it is not damaged and ensure that the outside diameter remains clean and dry.�
�
Position the oil seal, illustration "D", lipped side towards the engine, on �
to the seal guide.�
�
Push home the seal fully and squarely by hand into the recess formed in the �
cap and block until it abuts against the machined step in the recess.�
�
Withdraw the seal guide.�
�
Tighten the rear main bearing cap bolts fully and evenly to torque figure 9,0 �
to 9,6 kgf m (65 to 70 lbf ft).�
�
�
THE S.U. HORIZONTAL INTEGRAL FLOAT CARBURETTER (TYPE H.I.F.)
� �
Pollution control limits required by appropriate legislation are becoming �
increasingly difficult to achieve.�
�
The H.I.F. carburetter incorporates design features which will assist in reducing �
exhaust emissions to within the limits at present demanded.�
�
The new design features provide:�
�
(a) Automatic mixture adjustment relative to fuel temperature.
�
(b) Consistent accurate cold start mixture control.
�
(c) Improved idling mixture control and smoother progression characteristics.�
�
The basic operation principles of the S.U. carburetter remain unchanged.�
DESCRIPTION OF THE NEW DESIGN FEATURES
�Piston and Main Body
��
The base of the piston now includes an horizontal slot. With the piston in �
position, this horizontal slot envelopes a box section cast in the throttle �
disc side of the venture bridge.�
�
A drilling in the box section communicates with another drilling in the venture �
situated at the lower edge of the throttle disc. The slot in the piston together �
with the two drillings, form a controlled by-pass mixture feed.�
�
This new design feature provides better idling mixture control, and smoother �
progression characteristics.�
The Needle
��
This is a spring-loaded type needle, biased in light contact with the jet, �
towards the throttle disc end of the carburetter, so providing a consistent �
crescent shaped fuel emission area. �
�
To ensure maximum benefit from this new design feature, it is most important �
that the needle assembly is correctly fitted into the piston base. �
�
The needle is correctly fitted when the etch line on the needle guide is nearest �
to, and centrally placed between the two transfer holes, and the needle shoulder �
flush with the piston base. The raised 'pip' on one end of the needle guide �
provides the bias.�
�
This needle is not peculiar to the H.I.F. carburetter alone. It is currently �
fitted to the standard design S.U. carburetter fitted to some Home and Export �
model cars - e.g. 1750 Maxi and Marina range.�
Float Chamber Components
��
The float chamber is an integral part of the carburetter body, providing a fuel �
reservoir in which the newly designed, one-piece, jet and feed pipe is partially �
immersed. �
�
The horizontal link of the "L" shaped adjusting level is a bi-metal assembly �
submerged in the fuel and connected to the base of the jet. This bi-metal �
assembly senses changes in fuel temperature, and transmits the effects of �
these changes to the jet.�
�
Ten degree variation in fuel temperature is equivalent to 0.004" to 0.006" �
jet movement. �
�
This is an exhaust emission control design feature which provides automatic �
mixture control adjustment relative to fuel temperature.�
Cold Start Enrichment Device
��
It has been established that the method of cold starting on the existing S.U.�
carburetter is inadequate to meet all current and future pollution control �
legislation, for the following reasons. The amount of "jet drop" provided for �
cold start is not under accurate control, permitting day to day variation of �
the mixture enrichment provided for cold start purposes. It has also been �
proved with the aid of highly sensitive exhaust gas analysers that the jet �
does not always return to its original position after the cold start operation �
has been completed.�
�
The rotary valve type enrichment device fitted to the H.I.F. carburetter �
eliminates the jet movement discrepancies existing on other S.U. carburetters �
by providing an accurately controlled cold start mixture supply independent �
of the main jet. �
�
This is yet another development by British Leyland in pursuing a policy of �
continuous improvement in the design and quality of its products. �
�
September 1971
�
Product Training - Cars School.�
L.H. OVERDRIVE
�FAULT DIAGNOSIS
��
1. OVERDRIVE DOES NOT ENGAGE�
�
Insufficient oil in gearbox.
�
Electrical fault.
�
Low hydraulic pressure.
�
Damaged parts within unit.
�
�
2. OVERDRIVE DOES NOT DISENGAGE �
�
NOTE: If overdrive does disengage, do not reverse the car �
as extensive damage may result.�
�
Electrical control system fault.
�
Sticking clutch.
�
Damaged parts within unit.
�
�
3. CLUTCH SLIP IN OVERDRIVE�
�
Insufficient oil.
�
Low hydraulic pressure.
�
Worn or glazed clutch lining.
�
�
4. CLUTCH SLIP IN REVERSE OR FREEWHEEL CONDITION ON OVERRUN �
�
Worn or glazed clutch lining.
�
Broken circlip on sunwheel.
�
�
5. NOISE IN OVERDRIVE ONLY�
�
Epicyclic gear train worn.
�
Pump worn.
�
�
6. NOISE IN DIRECT DRIVE ONLY�
�
Cone clutch bearing worn.
�
�
Product Training (Cars)
�
October 1972�
�
GEARBOX
�GEARBOX - NOTES FOR INSTRUCTORS
�DIFFERENCES
��
The gearbox assembly fitted to the MGB GT V8 is very similar to the MGC box �
and the gear cluster is similar to the MGB. �
�
The main differences are as follows: �
�
The clutch release lever is different, being shaped to accommodate a steel �
sleeve and ball race thrust bearing which is similar in appearance to that �
used on the Morris Marina.�
�
The front cover incorporates an extended nose which supports the release �
bearing and sleeve.�
�
The laygear thrust washers have been altered from round steel washers with �
oil grooves to dimpled, copper covered thrust washers with tabs locating �
against webs inside the gearbox case.�
GENERAL
��
The two synchronizer hub assemblies are not interchangeable.�
�
The coupling sleeve of 3rd/4th synchro hub has a groove machined around �
it as identification. �
�
If both forks are fitted against the coupling sleeves the difference in �
diameter will he obvious. It is most obvious when 1st/2nd selector fork �
is fitted against 3rd/4th hub. �
�
The third motion shaft lock washer tabs fit into the recessed nut.�
�
Second gear thrust washer has two internal splines, locking it to the shaft.�
�
Third gear end float must be checked with a D.T.I., as the thrust washers �
fit into recesses in the gear, preventing the use of feeler gauges.�
�
Product Training (Cars)
�
June 1973
�
GEARBOX
�DATA
�| First motion shaft hearing nip | 0 to 0.001 in. (0 to 0,03 mm) | |
| Shims available | 0.002 in. (0,05 mm), 0.004 in. (0,10 mm) | |
| Gear endfloat - 1st and 3rd | 0.005 to 0.007 in. (0,13 to 0,18 mm) | |
| Gear endfloat - 2nd | 0.005 to 0.008 in. (0,13 to 0,20 mm) | |
| Laygear endfloat | 0.002 to 0.007 in. (0,05 to 0,18 mm) | |
| Laygear selective thrust washers (rear) | 0.1195 to 0.1215 in. (3,04 to 3,09 mm) | |
| 0.123 to 0.125 in. (3,12 to 3,17 mm) | ||
| 0.1265 to 0.1285 in. (3,21 to 3,26 mm) | ||
| 0.130 to 0.132 in. (3,30 to 3,35 mm) | ||
| 0.133 to 0.135 in. (3,38 to 3,43 mm) | ||
| Synchromesh hub spring - free length | 0.720 in. (18,3 mm) | |
| Selector detent spring - free length | 1.0625 in. (30,2 mm) | |
| Reverse plunger spring - free length | 0.9603 in. (23,02 mm) | |
DISMANTLING PROCEDURE
�Front cover
��
Dislodge the clutch release lever rubber boot from the flywheel housing.�
�
Remove the release lever pivot bolt and withdraw the lever complete with �
the bearing and sleeve. �
�
Remove the front cover.�
�
Note the shims fitted between the cover and the first motion shaft bearing.�
Overdrive and adaptor
� �
Undo the six retaining bolts and remove the remote control assembly.�
�
Remove the overdrive assembly from the gearbox adaptor.�
�
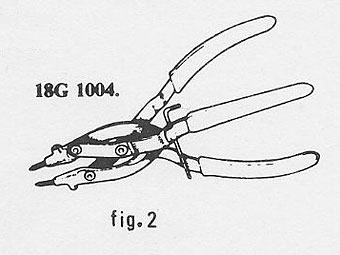
Slide the overdrive pump cam off the tail shaft and remove the driving �
ball. Using 18G 1004 (see fig 2) remove the cam circlip from the shaft.�
�
Engage 4th gear. �
�
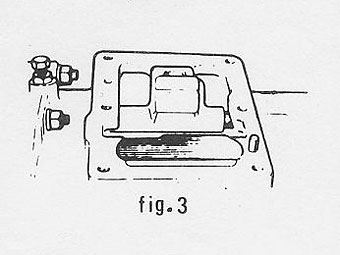
Withdraw the selector interlock arm and plate assembly (see fig 3), �
tilting the assembly as necessary.�
�
Remove the adaptor from the gearbox.�
�
Check the operation of the reverse plunger, reverse light switch and �
the overdrive isolation switch. �
�
 �
�
�
Selector forks and rods
� �
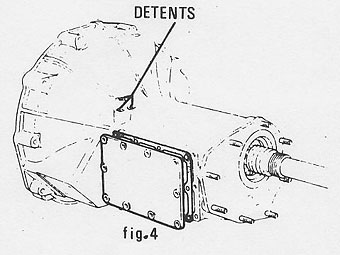
Remove the side cover.�
�
Remove the three selector detent plunger plugs and springs (see fig 4).�
�
Slacken the locknuts (7/l6 A.F.) and undo the fork retaining screws �
(1/8 Whit.)�
�
Withdraw the selector rods and remove the forks. �
�
If it is only necessary to remove the selector forks and rods, this �
can be done by following the above procedure from the heading 'Overdrive �
and adaptor' without removing the gearbox from the engine.�
�
 �
�
�
Reverse idler gear
� �
Knock back the locking tab on the shaft retaining bolt, remove the bolt �
and withdraw the shaft rearwards.�
�
Withdraw the gear from the case.�
�
Inspect the shaft, gear teeth and gear bearings for signs of wear or �
damage.�
First motion shaft
��
Carefully drift the layshaft from the gearbox forwards.�
�
Check that the laygear teeth are clear of the gear.�
�
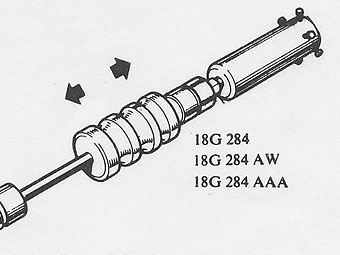
Fit the impulse extractor 18G 284 with adaptors 18G 284 AAA and �
18G 284 AW and remove the first motion shaft assembly. �
�
(First motion shaft dismantling described on page E4.)�
Third motion shaft
� �
Again, check that the laygear teeth are clear of the gears and �
synchro hubs. �
�
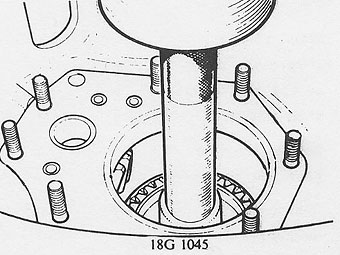
With the aid of hollow drift 18G 1045, remove the third motion �
shaft rearwards from the gearbox.�
�
Note the locating peg and the cut-away in the bearing flange �
which locates over it.�
�
(Third motion shaft dismantling described on page E4.)�
�
 �
�
�
Laygear
� �
Temporarily refit the layshaft and check the laygear end float, �
which should be 0.002 to 0.007 in. (0,05 to 0,18 mm).�
�
Remove the layshaft.�
�
Remove the laygear and thrust washers. Rear washer is selective.�
�
Check the layshaft, the laygear teeth and the laygear bearings for �
wear or damage.�
FIRST MOTION SHAFT DISMANTLING
� �
Withdraw the caged needle roller bearing from inside the rear end �
of the shaft.�
�
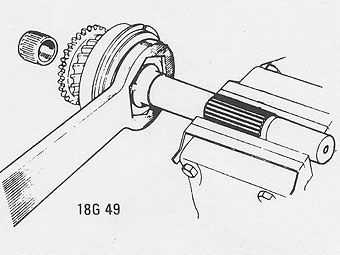
Knock back the bearing nut's lockwasher tab and fit tool 18G 49 to �
the nut.�
�
Clamp the shaft in a soft jawed vice (aluminium faced).�
�
Remove the nut (L.H. thread) and the lock washer, and then press the �
bearing from the shaft.�
�
Inspect the shaft and the bearing for signs of wear or damage.�
THIRD MOTION SHAFT DISMANTLING
� �
Check the end float of first and second gears with feeler gauges and �
the end float of third gear with a dial test indicator (D.T.I.). See �
data for correct end float.�
�
Remove the 3rd/4th synchro. hub assembly complete with baulk rings. �
(Note the annular groove on the coupling sleeve.)�
�
After knocking back the lockwasher tab remove the round nut from the �
front of the shaft using 18G 1024 then remove the lock washer.�
�
Remove the shaft sleeve, third speed gear and the interlocking thrust �
washer.�
�
Remove second speed gear and its thrust washer. �
�
Remove the lst/2nd speed synchro. hub assembly complete with baulk �
rings. �
�
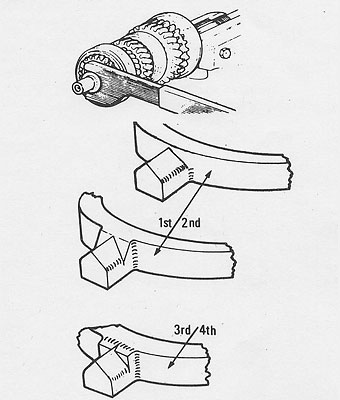
Note: Although the components of the two synchro. hub assemblies �
look similar, none of them are interchangeable from one hub to the other. �
(See right, for identification of baulk rings.) �
�
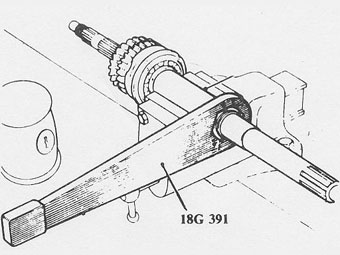
After knocking back the lock washer tab, use 18G 391 (see right) to �
remove the rear shaft nut.�
�
Having removed the nut and lock washer remove the distance tube from �
the shaft.�
�
Press he first speed gear, reverse gear and the bearing complete with �
housing from the shaft.�
�
Wrap a cloth loosely around the synchro. hub assembly to retain the balls �
and springs and push the hub out of the coupling sleeve.�
�
Check the gears, hubs, coupling sleeves, shaft and bearing for wear or �
damage. Also, if the gear endfloat was excessive check the gear thrust �
washers for wear. �
�
 �
�
�
 �
�
�
REASSEMBLY PROCEDURE
�� Replace any components found to be worn or damaged. �
�THIRD MOTION SHAFT
� �
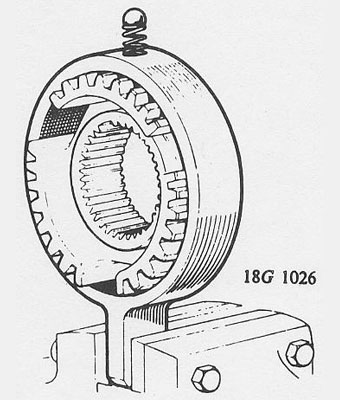
Use 18G 1026 to reassemble the synchro. hubs. The hub may face either way �
inside its own coupling sleeve but do not interchange them. �
�
Press the first speed gear, reverse gear and bearing onto the shaft.�
�
Refit the distance piece and a new lockwasher, and then tighten the nut with �
18G 391.�
�
Refit the 1st/2nd synchro. hub assembly. The assembly may face either way �
but remember to fit the correct baulk rings with it. �
�
Refit the thrust washer and second gear.�
�
Refit third gear to the shaft sleeve and fit the interlocking thrust �
over the tangs on the sleeve, then fit the assembly to the shaft. �
�
Fit a new lock washer, tighten the nut with 18G 1024 and lock with the �
lock washer. �
�
Refit the 3rd/4th synchro. hub complete with baulk rings.�
FIRST MOTION SHAFT
� �
Press the bearing onto the shaft.�
�
Fit a new lock washer and refit the nut. Clamp the shaft in a soft jawed �
vice (aluminium faced), tighten the nut with 18G 49 and lock with the �
lock washer.�
�
Insert the needle roller bearing into the rear end of the shaft. �
GEARBOX REASSEMBLY
�Laygear
��
If the laygear end float is outside the limits given in the dismantling �
procedure select thrust washers.�
�
Fit the laygear with bearings and thrust washers and lay it in the �
bottom of the gearbox.�
Third motion shaft
��
Enter the assembled shaft into the gearbox from the rear.�
�
Check that the laygear teeth are clear of the shaft gear teeth.�
First motion shaft
��
Carefully drift the assembled shaft into the casing, ensuring that the �
laygear teeth do not foul the shaft gear teeth.�
�
The layshaft can now be refitted from the front. Note: cut-away locates �
in front cover. �
Reverse idler gear
� �
Place the gear into the gearbox.�
�
Fit the shaft aligning the dowel hole with the locating bolt hole.�
�
Fit the dowel bolt with a new tab washer, tighten the bolt and lock �
with the tab.�
Selector forks and rods
� �
Fit the selector forks over the synchro. hubs and reverse idler.�
�
Clean any burrs from the rods at the fork location points.�
�
Ensure that the detent plungers are clear of the rod holes and refit �
the rods. �
�
Tighten the fork retaining screws and lock the lock nuts. �
�
Refit the selector detent springs and plugs.�
�
Refit the side cover, �
OVERDRIVE AND ADAPTOR
��
Refit the adaptor to the gearbox.�
�
Engage 4th gear. �
�
Refit the overdrive pump cam circlip to the shaft using 18G 1004. �
Refit pump cam driving ball to the shaft then fit the cam over it. �
Rotate the gearbox mainshaft until the lowest point of the pump cam �
is nearest to the pump plunger. This is to enable the plunger to ride �
over the cam.�
�
Refit the overdrive to the adaptor.�
�
Refit the remote control assembly.�
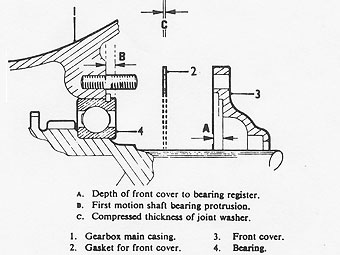
FRONT COVER
� �
Measure the depth of the register in the front cover "A". �
�
Measure how much the first motion shaft bearing outer race protrudes �
from the casing "B".�
�
Calculate the thickness of shims required between the front cover and �
bearing as in the following example: �
�
Front cover gasket (compressed thickness) = 0.015 in. (0,38 mm)�
�
plus (+) shim register depth of 0.228 in. (5,79 mm) �
�
equals (subtotal) 0.243 in. (6,17 mm)�
�
minus (-) bearing protrusion of 0.218 in. (5,54 mm)�
�
Equals (total) 0.025 in, (0,63 mm) �
�
The shim thickness required is the calculated figure
�
+ 0.001 in. (0,03 mm) for bearing 'nip'. �
�
Shims are available in the following sizes: 0.002 in. (0,05 mm) �
and 0.004 in. (0,10 mm).�
�
Fit new front cover gasket.�
�
Fit the front cover, ensuring that the shims are properly positioned, �
and tighten the nuts.�
�
Coat the clutch lever pivot bolt and the rear half of the clutch �
release bearing bore with Duckhams Laminoid grease or the equivalent.�
�
� BritishV8 Magazine has assembled the largest, most authoritative collection of MG � "MGB GT V8" information you'll find anywhere. Check it out! � Access our � MGB GT V8 article index by clicking here. �
�
