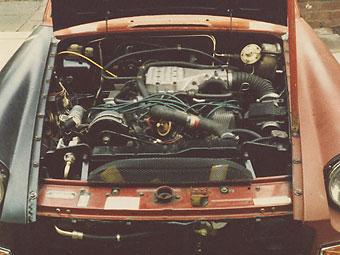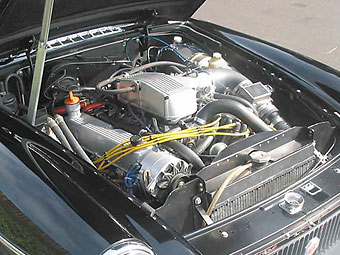

Rover Airflow Meter (left) and Rover Hot-Wire (right) EFI Installations
Fuel Injection, Not Such A Black Art
as published in MG V-8 Newsletter, Volume V Issue 2, August 1997by Roger Parker
Editor Kurt Schley noted: Roger Parker is the MG V-8 Representative for the MG Car Club (UK), has authored dozens of articles pertaining to the V-8 conversions, and is a regular contributor to "The MG V-8 Newsletter".
Wherever you are in the world it's almost certain that many of the cars around
you will now have engines controlled by fuel injection or fuel engine management
systems. We probably drive these around without giving them a second thought,
and the reliability of current systems means that you don't have to worry what
is happening under the hood.
When these systems were first introduced, they were regarded as something of a
black art, and anything that happened to the engine was immediately the fault
of the "injection" or "brain", when often it would have been something simple
like too many miles on a set of spark plugs. The problem is that when you open
the hood and you are confronted by a mass of wires, pipes and other bits, which
often completely hide the engine, you feel like simply shutting it all up again
and giving the job to "someone who knows". This has meant that the black art
name has remained.
If you take the time to study how a simple and basic engine management system
works, and then fit in all of the extra bits which provide the extra controls
for this and that, it is amazing how straightforward most systems really are.
Even when you compare different manufacturer's systems it soon becomes quite
easy to understand where each part is and what it does.
Understanding this subject is greatly assisted if the system is split into
three separate sections: (1.) fuel flowing components, (2.) air flowing
components and (3.) control components. By studying the system this way the
operation of each section can be understood very much easier. Then only the
interaction between each section needs understanding to enable the whole to
be understood.
Now that you have an understanding of the system you can commence to install
it. Modification of any MGB V8 from a carburetor to injection is extensive
but well worth the effort. Briefly, the conversion route should go something
like this:
Fuel flowing components
Here we have to modify or change virtually every part of the MG. system which
carries fuel. We must also take on board the fact that a fuel injection system
moves very high volumes of fuel at very high pressure, far, far, greater than
any of the original carburetor set-ups. Consequently, every part of the fuel
system has to be designed for such operation and assembled to a very high standard.
Rover's injected engines rely on an uninterrupted supply of perfectly clean fuel
at a given pressure, usually between 1.8 and 2.5 bar (28 - 36 psi), although the
fuel pump can deliver over 4 bar (60 psi). To install this in an MGB requires
considerable changes. The fuel tank has to be internally modified with an
additional internal reservoir so that fuel surge doesn't uncover the fuel pick
up and cause the engine to cut out. This is known as a swirl pot and carries both
a large bore fuel pick up and a return from the engine (Spill return)
Alternatively an external swirl pot can be fabricated but this involves more
complication, with feeding one tank from the other and needing extra space to
fit it Fortunately, many specialists are now quite familiar with the process of
fitting a swirl pot in fuel tanks not previously so endowed, and at quite reasonable
prices. The other alternative is obviously to use the tank from the RV8 as
this has all the required modifications for injection, as well the extra
fittings for the evaporative loss systems, which retain all fuel vapors within
the fuel system. (If the goal is to have a full 3 way closed loop catalyst
system then this is the tank to use, along with a charcoal canister.)
Next in line is a pre-filter which helps give the fuel pump a greater life
expectancy. This is fitted in the fuel line before the fuel pump. The pump to
use is one specifically designed to deliver the required volumes and pressure.
To this end an external Bosch pump, as found on the RV8, Maestro/Montego EFI
(and Turbo) models, Rover Vitesse (pre 1989, 26 and V8), and a myriad of other
Bosch injected cars can be used. Next in line is the most important filter which
saves you ruining 80 pound a time injectors! This filter has to be specifically
for a fuel injection set up as it will have to withstand those high pressures.
Fuel line bore can be the same as the original MGB, which is a quarter inch (6mm),
any less can cause strain on the pump. ALL flexible hoses must be designed for
injection systems and not of the cheap braided type often found in motor shops.
There needs to be two separate pipe runs between the front and rear, one for the
feed and one for spill return. Mounting these where the original pipe runs is
probably the best route. In the engine bay the fuel feed will pass to the fuel rail
above the left hand bank, and the fuel return will pass above the other bank.
Air Flowing Components
Modifications vary, depending on which variation of the system you are using, whether it is: (1.) an Airflow Meter System (flap type of meter) or the early Australian/Federal SD1's, which had very compact manifold castings. These were two piece units, with the plenum being flat and triangular shaped. (2.) The same Airflow Meter System fitted to a high efficiency manifold, and which was seen first in the V8 Vitesse and later the Range Rover. This time the manifold was a three piece assembly, about 3.5" taller than the earlier system with a characteristic ribbed and domed top. (The Twin Plenum Vitesse used a similar system with a twin throttle design.) Or (3.), the same high efficiency manifold fitted with the Hot Wire system, (from 1989 with no moving parts in the meter) which fueled 3.5, 3.9 and 4.2 litre engines.
Enjoying this article? Our magazine is funded through the generous support of readers like you!
To contribute to our operating budget, please click here and follow the instructions.
(Suggested contribution is twenty bucks per year. Feel free to give more!)
Most recently the new Range Rover saw the introduction of the GEMS 8 fully digital
total engine management system which for all practical purposes can't be retro
fitted to earlier engines. The latest engines, designated 4.0 and 4.6 litre to
avoid confusion with earlier engine capacities, are seriously reworked and few
parts are interchangeable.
Whatever system is chosen the biggest problem to overcome is one of hood clearance.
Quite simply only the very early system has any chance of fitting under without
mods, and only then if the engine is mounted as per the original factory V8's or
RV8's. (Even then production variations can cause problems!) The early systems
(Federal two piece manifold systems) may fit without modification, but if not they
can easily be modified by having a little metal removed from the plenum chamber,
where it joins the manifold. Up to 1" can be removed before the throttle gets too
close to the left hand rocker cover.
The Vitesse style of manifold is considerably higher so more metal has to be
removed from various parts of the castings to avoid a hood bulge. Alternatively,
as the dimensions of this manifold are the same as the later Hot Wire type, (also
used on the RV8) so an RV8 hood, or copy, could be used. To fit under a standard
MGB hood requires careful metal removal from several parts of the manifold castings.
The later Hot Wire system benefits here from having system components which allow
a greater height reduction, although all systems can be shoehorned under the
standard lid.
Once the hood clearance has been sorted then the only matters to be addressed
are the mounting of the airflow meter and air filter. On the earlier systems
the body of the meter has tapped mounting lugs that allow a simple bracket to
be made and attached to the nearside inner wing. The Hot Wire type is more
involved as the meter must be electrically isolated from the car's body. The
simple answer is to use an RV8 bracket, which is virtually a Range Rover air
filter assembly with the filter box removed.
For the air filter, I have always used a K&N unit simply clamped on to the
airflow meter. This design was adopted for the RV8 and I see no need for change,
other than perhaps to extend it forward to provide better cold air pick up.
Control Components
The beauty of the V8 injection system is that it can be retro-fitted to any earlier V8 simply by using the later inlet (well) gasket, and having small notches created in the inlet port for injector clearance In fact the gasket provides a perfect template for this. The whole system, including all control components, fits within the V' of the engine and comes complete with a separate wiring harness, which contains all the connections for all functions. Only some six wires, with slight variances depending on system, are needed to be connected to the car's original harness, making this a really user friendly operation.

Choice of System
Any system can be used and if fitted correctly and set up properly will
provide considerable advantages over any carburetor normally fitted to
the V8, I have seen all of the variations of injection system for sale
with prices ranging from 1200 to 1800 pounds. With this sort of equipment
you usually get what you pay for so let the buyer beware, following these
few guidelines. (There is often a reasonable source of engines and injection
systems found within Land Rover publications, where Range Rover and Discovery
owners convert from the V8 to a big diesel motor.)
Always buy a complete system with the exception of the fuel pump, which if
it came from a Range Rover is different anyway. That means manifold,
injectors, fuel rail, fuel pressure regulator, throttle potentiometer,
water temperature sensor, airflow meter, wiring harness and ECU.
Additionally if it's an earlier Airflow Meter System then it also has an
"extra air valve," "thermotime switch," "cold start injector," and a
"power resistor," so get these. Very early systems (Federal) also used a
complicated single multi-function relay which is no longer available, but
the wiring can be converted to the later two diode equipped relays and a
"steering module."
If it's a Hot Wire system then you don't get the "extras" indicated in the
previous paragraph, but you will need the "stepper motor" and "fuel temperature
switch" specific to this system.
All of the systems fitted to the V8 engines are of Lucas manufacture, but in
detail many of the parts used are pure Bosch. This does give the considerable
advantage that many other cars, not necessarily within the Rover range or even
LTK manufactured, will have identical parts that can be used. Indeed certain
upgrades from standard specification can be undertaken this way.
As a general rule only the ECU's are pure V8 only items, and there are quite a
few companies capable of changing the internal parameters of these, at a price!
Fortunately the standard ECU's will generally handle up to about 30% more power
without need for modification. The motto is to try the standard unit first, as
I have achieved excellent results with a standard 3.5 litre ECU on a 4.3 litre
engine producing 50% more power.
Catalysts
It is a fact that the main reason for development of injection systems was
to provide legal compliance with various emission legislation, and so all of
the systems used on the V8 have always had the option to use a catalytic converter
or (more often) two, one per bank.
It is also true that the requirements of the late 1970's are different to today's,
so whilst the earlier system may use a catalytic converter it may not provide total
compliance with current requirements. So if you want the injection system to provide
the "cutting edge" in emission levels then the newer the system the better. To that
end the Hot Wire system is the one that is most likely to be able to comply,
especially since the Range Rover and Discovery models have been developed for most
major markets, their ECU's can simply be plugged into any Hot Wire system, with the
possible additional change of what is called the "tune resistor" which is rather
like a plastic fuse easily accessed in the loom!
Other Considerations
There are many other things that I could mention but that would fill a book,
such as the use of road speed sensors, inbuilt speed limiters, idle speed control
inputs etc, etc. Suffice to say that anyone wishing to go the injection route is
very welcome to contact me and discuss their plans.
I would recommend anyone to read the relevant chapters of "How to Give your MGB
V8 Power" by Roger Williams, and "Tuning the Rover V8" by David Hardcastle. The
information in the chapters on fuel injection for both books was supplied by me,
and reading either saved me much time repeating the same information. These books
will provide sufficient information to decide whether the injection route is viable
for you. If you still intend to follow this route and have queries then letters
are better as you can read the reply over and over again to aid understanding,
something you can't easily do with a phone call, especially trans-Atlantic.
Telephone enquires are welcome at any reasonable time by phone on, UK code
+ 1827 287986 or write to me at MG House, 8 Rydal, Wilnecote, Tamworth, Staffs,
B77 5TB England.
ADDITIONAL INFORMATION
| If you like this article, you'll probably also like: | ||
| 1 | Hot To Service Rover 14CUX Electronic Fuel Injection by Curtis Jacobson, | |
| 2 | British V8 2007 Tech Session: How To Install Rover EFI presented by Jim Stuart, and | |
| 3 | Glen Towery's Method for Installing Rover Hot-Wire EFI by Greg Myer. | |
| You may also like to review how Rover EFI systems have been installed on these sports cars: | ||
| 1 | Evan Amaya's Rover powered 1964 MGB | |
| 2 | Neil Brown's Triumph powered 1968 Triumph TR-250 | |
| 3 | Bob Edgeworth's Rover powered 1972 MGB | |
| 4 | Mark Mallaby's Rover powered MG RV8 | |
| 5 | Scott Miller's Rover powered MG RV8 | |
| 6 | Nick Nicholas's Rover powered MGB | |
| 7 | Jim Stuart's Rover powered 1966 MGB | |
| 8 | Glen Towery's Rover powered 1974 MGB/GT | |
| 9 | Barry Yardley's Rover powered 1977 MGB | |
| 10 | Edd Weninger's Rover powered 1977 MGB | |
Disclaimer: This page was researched and written by Roger Parker. Views expressed are those of the author, and are provided without warrantee or guarantee. Apply at your own risk.

